Print Entire Sheet on One Page (Using the “Fit to Page” Feature)Learn how to fit an entire sheet on one page in Excel
Let’s say that you’re done working with your Excel sheet.
You did what you can to make it look presentable and easy to read.
You adjusted the column width, row height, font size, etc.
Heck, you even added nice-looking headings. All that’s left is to print the sheet.
So you press the print button and this is what you see:


One of the columns appears on another page instead, which isn’t what you wanted. You want all the columns to appear on one page instead.
Also, some of the rows appear on another page. Instead of having only one page, the print preview says that your printout will have 4 pages.
So you go back to adjusting the rows and columns. But what if I tell you that Excel has a feature that allows you to fit your print selection into one page?
There are also the options of fitting just the columns or rows into one page.
Sure, printing in Excel isn’t as intuitive as printing in Word. What you think would appear as your printout might not be the same as what Excel thinks it will be.
Columns and/or rows may be awkwardly cut. The text may appear larger or smaller. That’s just how it goes with Excel.
But to make up for it, Excel has the “Fit to One Page” feature. With it, you don’t have to manually adjust your sheet just to achieve your desired printout. No more trial and error too!
In this article, you’ll be learning how to use the ‘Fit to Page” feature of Excel. This nifty feature can be used to fit a sheet, columns, or rows into one page.
By the end of this article, you should be able to use the feature to get the printout that you desire.
Fitting a Sheet into One Page From the Page Layout Tab
For the first method, you’ll be fitting a sheet on one page from the Page Layout tab.
When your open this tab, the ribbon will appear as this:

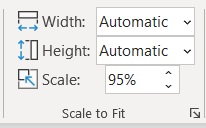
Somewhere in the middle section of the ribbon, you should see a “Scale to Fit” section:

You’ll be using this section to fit the sheet into one page when printing.
How to Fit Sheet on One Page
- Open the sheet that you want to print. If you want to print a certain area of the sheet, select it and set it as the print area.
- Open the Page Layout tab. In the middle section of the ribbon, you should see a “Scale to Fit” section.

- If you want to fit the sheet on one page, set both the Width and Height to 1 page. To do this, click the dropdown arrow on the left side of the textbox after Width. From the options, select “1 page”. Do the same for the textbox beside Height.

- The sheet or your print area should all appear on one page. To check, press the keyboard shortcut Ctrl + P to open the print menu (as well as the print preview). Alternatively, you may open the File tab, then select the Print menu.
Fit Columns or Rows on One Page
If you only need the columns to appear on one page without minding whether the rows appear on several pages, all you need to do is set the textbox after Width to “1 page”.
You don’t need to touch the textbox after Height (it should be set to Automatic by default.)

If you only need the rows to appear on one page without minding the columns appearing on several pages, then you only need to set the textbox after Height to “1 page”.
You don’t have to manually set the textbox after Width (it should be set to Automatic by default).

Things to Note When Fitting Sheet on One Page
Fitting a sheet, columns, or rows on one page will always make the date look smaller.
This isn’t that much of an issue if the sheet only has a few rows or columns. However, for large datasets, this might make the printout very small to the point of becoming unreadable.
To somewhat remedy this, you can set the Page Orientation to Landscape.
This way, you can fit more columns on one page compared to using the Portrait orientation. You may also want to print the sheet on paper that has a larger size (e.g. legal size).
Fitting a Sheet into One Page From the Print Preview Screen
For the next method, you’ll be fitting a sheet into one page from the Print Preview screen.
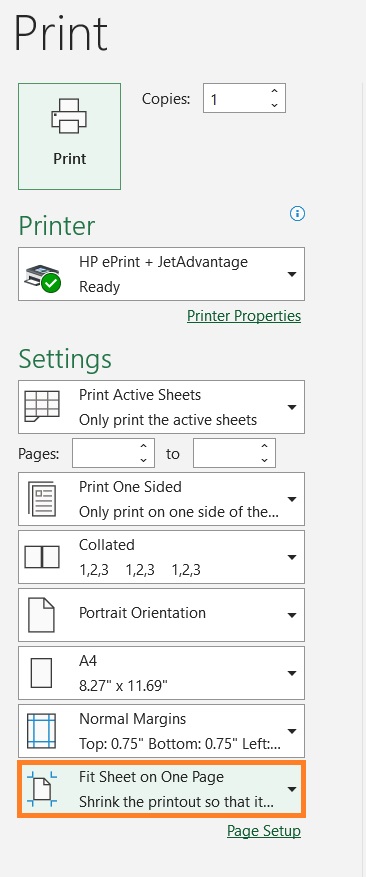
Here’s an example of a Print Preview screen:

On the left side, you’ll see several print settings that you can adjust to your preference.
The very last setting allows you to fit the sheet or print area on one page:

How to Fit Sheet on One Page
- Open the sheet that you want to print. If you want to print a certain area of the sheet, select it and set it as the print area.
- Open Print Preview. To do so, press the keyboard shortcut Ctrl + P. Alternatively, you may open the File tab and then select the Print Menu.

- On the left side of the Print Menu, you should see several print settings. Click the one on the very bottom.

- You should see several fitting/scaling options.

- No Scaling is the default setting. It prints the sheet or print area as is. Fit Sheet on One Page allows you to do just that – fit the sheet or print area on one page. Fit All Columns on One Page is the option that you want if you need to fit the columns on one page. The rows may be broken into several pages. Fit All Rows on One Page is the option that you want to fit all rows on one page. The columns may be broken into several pages.
- Select the option that you want. For our illustration, we’ll be selecting the Fit Sheet on One Page.

- The sheet or your print area should all appear on one page.

Using Page Breaks to Set Your Printout
The next method isn’t specific to fitting the sheet on one page. Rather, you use it to divide the sheet or print area into several pages.
This is particularly useful if you’re printing a sheet with a large data set. To do so, you’ll be using Page Breaks – dividers that specify where pages begin and end.
Excel automatically assigns page breaks, but you can manually set them via Page Break view.
To access this mode, open the View tab. On the left side of the ribbon, you should see a Page Break Preview button.

Automatically added page breaks will appear as dashed lines. Manually added page breaks will appear as solid lines.

To adjust these page breaks, all you need to do is click on one and adjust as you see fit (drag the page break to your desired location).
You can also use this method to fit the sheet or print area on one page.
To exit, this mode, you only need to click the Normal button beside the Page Break Preview button.

To check what your printout would look like, press the keyboard shortcut Ctrl + P to open the print menu (as well as the print preview). Alternatively, you open the File tab, then select the print menu.
Page Breaks and Scaling Options
Do note that if your scaling option is set to “Fit Sheet on One Page”, you will not be able to manually set page breaks.
Excel will always fit the sheet or print area on one page. To be able to manually set page breaks, the scaling option should be set to the default setting (No scaling).
Conclusion
And those are several methods you can use to fit a sheet, its columns, or rows on one page.
You should be able to create printouts that you want now.
