Insert Data from Excel into MS Word4 Different Ways to Import Data from Excel into MS Word


When you’re working with data, charts, or tables, you usually do it in Excel.
While you could technically do it in MS Word, the process isn’t quite the same.
But what if you need to import a data table into MS word?
What if you want to show a portion or the entirety of an Excel workbook in MS Word for reporting purposes?
What if you’re working on a table in Excel with the intent of transporting it into MS Word later?
Fortunately, you’re allowed to do that.
By that, I mean that you can import data from Excel into MS Word.
The question now is how to do it.
I’m pretty sure you’ve already tried the ever-reliable copy-paste method.
And while it works, you’ll soon notice that it has limitations.
For one, the resulting table doesn’t always look like the one in Excel.

But that’s fine. There are other methods that you can follow for importing data from Excel into MS word.
In this article, you will learn how to import data from Excel (or even the Excel file itself) into MS Word.
We’ll go over 4 different ways of accomplishing this task:
- Copy-Paste Method
- As an Embedded Object
- As a Linked Object
- Using the Insert Object Button
We’ll start simple (with the ever-reliable copy-paste method) and then go a little more complex along the way.
Let’s get started!
1. The Ever-Reliable Copy-Paste Method
Everybody using Excel or MS word should know “copy-paste” by now.
But if you aren’t the copy-paste is actually a combo of two actions: copying data (via Ctrl + C) and pasting (via Ctrl + V) the copied data to another location.
This tried-and-tested method also works for importing data from Excel into MS word.
You simply have to copy the data in Excel and then paste the copied data into MS word. Simple right? Here are the steps to do it.
- Open the Excel file that contains the data that you want to import into MS word. Select the portion of the file that you want to import. Copy it by pressing the keyboard shortcut Ctrl + C (or you can right-click anywhere on your selection then select Copy). Green broken lines should now start appearing around your selection. This indicates that your selection is being copied.

- Open the Word document where you want to import the copied data. Place your cursor where you want to show the copied data.
- Paste the copied data by pressing Ctrl + V. Alternatively, you can right-click on the location where you want to insert the copied data and then select Paste.

When you finally paste the data from Excel into MS Word, you’ll notice that it has now become a regular MS word table.
You’re now free to edit the table as you want (e.g. deleting columns or rows, inserting rows, editing values, etc.).
Things to keep in mind when using this method
- This method does not work for large tables
- Some of the formatting changes you made in Excel might not be reflected in MS Word
- Any changes made in the imported will not reflect in the original data in Excel (and vice versa)
- Any value that resulted from Excel formulae will be pasted as values. You cannot import Excel formulae into MS word using this method
2. Insert Data from Excel into MS Word as an Embedded Object
Thanks to the Windows OLE technology (Object Linking and Embedding), it is now possible to embed objects from one application to another.
Thus, we can use it to embed an object in Excel into an MS word document.
It’s similar to the copy-paste method but with some extra steps. You still copy the data from Excel. Then, you paste the copied data into MS Word as an embedded object. Here are the steps to do it.
- Open the Excel file that contains the data that you want to import into MS word. Select the portion of the file that you want to import. Copy it by pressing the keyboard shortcut Ctrl + C (or you can right-click anywhere on your selection then select Copy). Green broken lines should now start appearing around your selection. This indicates that your selection is being copied.
- Open the Word document where you want to import the copied data. Place your cursor where you want to show the copied data.
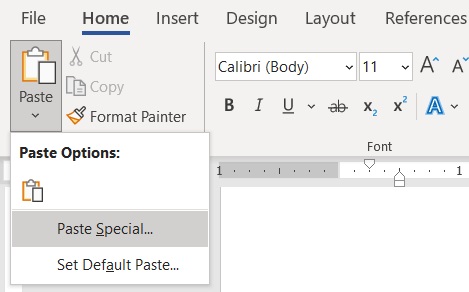
- Open the Home tab. You should find a Paste button on the left-most side of the tab. You should also see a dropdown button. Click on it. Then, select and click on Paste Special. This will open the Paste Special dialog box.
- In the Paste Special dialog box, make sure to tick the button before Paste. In the box below “As:”, select Microsoft Excel Worksheet Object. This will embed the copied data as an Excel table. Click the OK button.

- You have successfully imported the data from Excel into MS Word as an embedded object.

It’s an Excel table but in MS Word
Unlike the copy-paste method where the inserted table becomes a regular MS Word table, this table works exactly like an Excel table.
Double-click anywhere on the table to edit it as an Excel table. Here’s what it would look like after you double-click:

Just like any regular Excel table or sheet, you can enter Excel formulae here or perform various Excel functions. To exit this mode, just click anywhere outside of the table.
Things to keep in mind when using this method
- Any changes made in the imported will not reflect in the original data in Excel (and vice versa)
- The resulting table will the formatting of the original data
- You might have to edit your margins if the resulting table doesn’t fit the document
3. Insert Data from Excel into MS Word as a Linked Object
While the second method results in importing an Excel table into MS word, there is the limitation that any changes in the source will not reflect in the pasted table.
So if you want, to import a table from Excel into MS word where any change in the source is reflected, then it’s not the perfect method for you.
So rather than inserting the data as an embedded object, why not insert it as a linked object instead?
Unlike an embedded object, a linked object maintains an active connection between the target location (MS word) and the source (Excel).
So any changes made in Excel will reflect in the table in MS Word.
Here are the steps to insert a linked object into MS Word
- Open the Excel file that contains the data that you want to import into MS word. Select the portion of the file that you want to import. Copy it by pressing the keyboard shortcut Ctrl + C (or you can right-click anywhere on your selection then select Copy). Green broken lines should now start appearing around your selection. This indicates that your selection is being copied.
- Open the Word document where you want to import the copied data. Place your cursor where you want to show the copied data.
- Open the Home tab. You should find a Paste button on the left-most side of the tab. You should also see a dropdown button. Click on it. Then, select and click on Paste Special. This will open the Paste Special dialog box.
- In the Paste Special dialog box, make sure to tick the button before Paste link. In the box below “As:”, select Microsoft Excel Worksheet Object. This will insert the copied data as a linked Excel table. Click the OK button.

- You have successfully imported the data from Excel into MS Word as a linked object.
Double-click on the table to open the source
You can now edit the newly imported table. To do so, double-click anywhere on the table.
Doing this will open the Excel from which the table is linked.
Any changes you do in the source will then be automatically reflected in the linked table in MS word (even if you don’t save the changes in Excel).
In the unusual case where the changes do not automatically update the table, you can just right-click on the linked table and then select Update Link.
Things to keep in mind when using this method
- You might have to edit your margins if the resulting table doesn’t fit the document
- To make changes to the linked object, the original or source Excel file must be open.
4. Link the Excel File into MS Word Via the Insert Object Button
If you want to insert an entire Excel file as a table in MS word, then this method is ideal for you.
But first, make sure you know the location of the Excel files that you’re inserting into MS Word.
- Open the Word document where you want to insert the Excel file.
- Open the Insert tab. You should find an Object button on the right side of the tab. Click it. This will open the Insert Object dialog box.

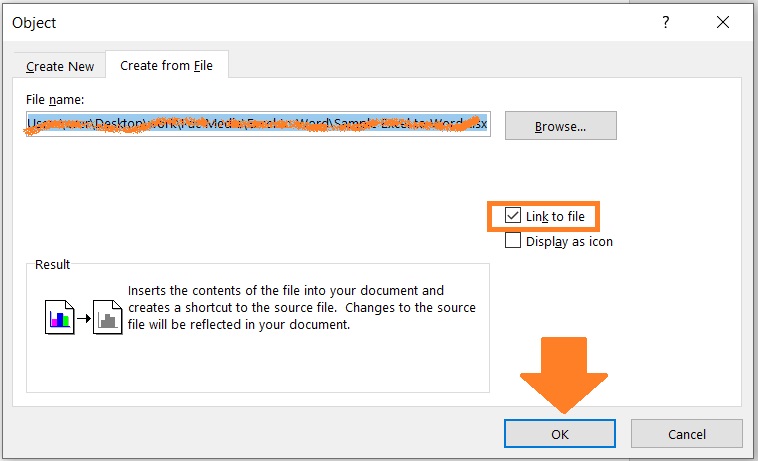
- In the dialog box, open the Create from File tab. Then click the browse button. Navigate to the Excel file that you’ll be inserting. Double-click on it or select it then press the Insert button.

- Back to the dialog box, make sure to check the box before Link to file to insert the Excel file as a linked object (if you want to insert it as an embedded object, do not check the box). Click the OK button.
- You have successfully imported the Excel file into MS word as a linked (or embedded) object.
Conclusion
And those are the different methods to import data from Excel into MS word.
Each has its own pros and cons.
Choose the method that best suits your situation.
I hope this article was able to help you