Enter Sequential Numbers in ExcelLearn the various ways to enter sequential numbers in Excel
When you’re working with a dataset in Excel, you most probably want to number your rows.
And not just that, you’d probably want the numbers to be in a sequence (i.e. sequential numbers).

Having sequential numbers on your dataset makes it easier to navigate. You can also use them to assign a unique number to a particular attribute (name, product, store, etc.)
But how do you enter sequential numbers in Excel?
The most obvious way to do it is to enter the sequential numbers manually.
So enter 1 in A2, enter 2 in A3, and so on. Now, imagine working on a huge data set, one that has hundreds or thousands of rows of data. Would you still want to type the sequential numbers manually?
Most probably, you don’t want to. It’s tedious and can take a long time. You’re better off spending it on something else.
Fortunately, doing them manually one by one isn’t the only way. There are other (more efficient) ways to enter sequential numbers in Excel. You could do it with a formula, with the fill handle, with an Excel command, etc.
In this article, we will be exploring the different options we can enter sequential numbers in Excel.
We’ll be learning how to do each of them. By the end of the article, we should be able to enter sequential numbers in Excel in various ways.
Use the Fill Handle to Enter Sequential Numbers
Excel’s Fill Handle feature is a nifty tool that can identify patterns in your data.
It can then project these patterns to the rest of the cells in a column or row. For example, a cell in a column contains a formula.
You want to enter this formula into the rest of the cells in the same column. Rather than copy-pasting the formula, you can use the Fill Handle to fill in the formula into the rest of the cells.
To access the fill handle, first select a cell or set of cells. Then hover your mouse to the bottom-right corner of the cell (or most bottom-right cell in a set).
A cross symbol should appear. This is the fill handle.

There are two ways you can access the fill handle. One way is to click and drag. The other way is to double-click it.
How to Use the Fill Handle to Enter Sequential Numbers
Here we have the following data:

In column A (Serial No.), we want to enter sequential numbers. We’ll do this by using Excel’s Fill Handle feature.
- Enter 1 in cell A2. Then, enter 2 in cell A3. This makes our sequential pattern which we’ll need for the Fill Handle to work properly.
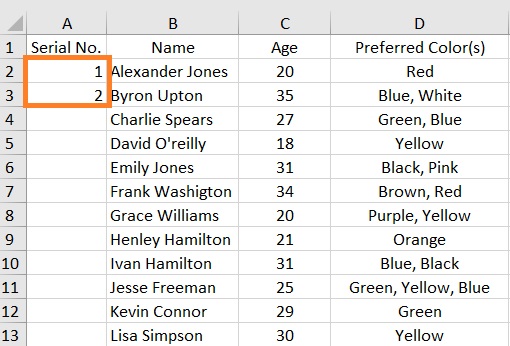
- Select both cells A2 and A3. You should see a small square at the bottom-right corner of cell A3. Hover over this square to access the Fill Handle.

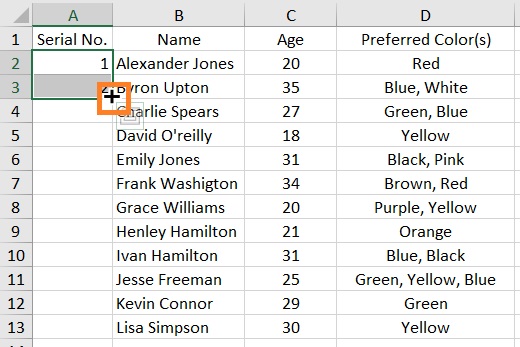
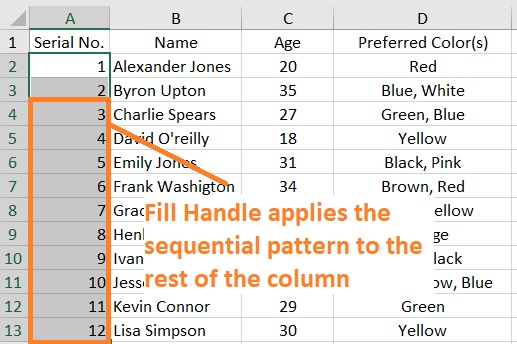
- Double-click the Fill Handle. This will automatically fill the rest of the cells in the column (until the end of the dataset). Alternatively, you can click and drag the Fill Handle until the end of the dataset.
Things to Keep in Mind When Using the Fill Handle
- Double-clicking the Fill Handle only works if there is data in the adjacent column. It will not work if the adjacent column is empty.
- Double-clicking the Fill Handle only works until the last non-blank row in the dataset. If there are blank rows in between the dataset, double-clicking the Fill Handle will not work as desired
- Click and drag the Fill Handle to apply the pattern to the selected cells regardless of whether or not there is data on the adjacent column.
- After using the Fill Handle, the sequential pattern will not update if you insert or delete a row.

Enter Sequential Numbers by Adding One to The Previous Number
A way to enter sequential numbers similar to the previous one is the add one (1) to the previous number in the sequence.
We do this by using a very simple formula.
For illustration, we will be using the same dataset as above.
- Enter 1 in cell A2.
- In cell A3, enter the formula =A2+1. Press the Enter key. This should result in the cell showing 2.


- Use the Fill Handle to fill in the formula to the rest of the cells in the column (either double-click or click-and-drag). Alternatively, you can copy the cell with the formula and paste it onto the selected cells.
Do note that similar to using the Fill Handle, the sequential pattern will not update when you insert or delete rows.
Use Fill Series to Enter Sequential Numbers
Another way to enter sequential numbers is to use the Fill Series function.
While not as quick as the Fill Handle, it gives you more control over how you want to enter sequential numbers.
You can access this function by clicking the drop-down menu next to the Fill button found on the Home Tab.
How to Use Fill Series to Enter Sequential Numbers
We’ll be using the following data for illustration purposes:

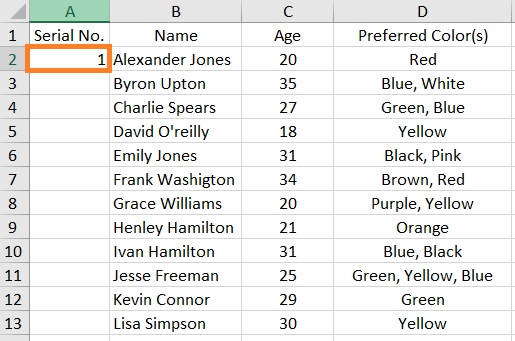
- Enter 1 on the cell where you want to start the sequence. In our illustration, it will be cell A2. Then select the cell.
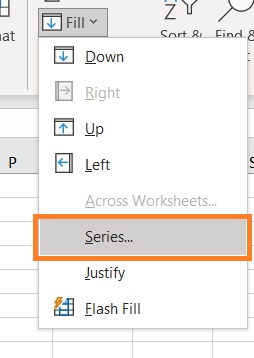
- Open the Home tab. You should find a Fill button on the right side of the tab. Click the drop-down menu next to it. This will provide you with several options. Select Series.

- This will open the Series dialog box. In the “Series in” category, select columns. This will fill the number series in a column.
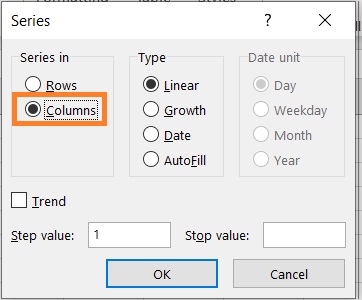
- In the text box next to “Step value”, enter how much the next number in the sequence will grow. Since you want to enter sequential numbers, enter 1 as the step value (which is the default value).

- In the text box next to “Stop value”, enter the last number of the sequence. We will be using 12 for our illustration.

- Click the OK button.

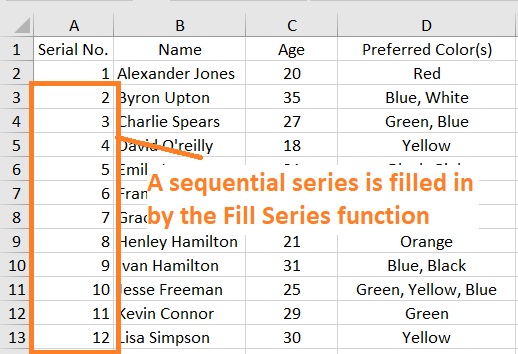
- This will enter a series of numbers on the column until the stop value is reached.
Things to Keep in Mind When Using Fill Series
- Fill Series will still work whether or not there is data on the adjacent column. It will also fill in black rows.
- Similar to using the Fill Handle, inserting or deleting a row will not update the sequential pattern.
Use the ROW Function to Enter Sequential Numbers
Another way to enter sequential numbers in Excel is to use the ROW function (via a formula).
What distinguishes this method from the others is that the sequence will not change even if you insert or delete rows, or sort your data.
This is useful if you want to ensure that the sequencing of the numbers remains the same whatever you do with your data.
To use the ROW function, enter the formula =ROW().
This will return the number of the row that the formula is in.
If you want to start the sequencing on the second row, you will have to enter =ROW()-1.
How to Use the ROW Function to Enter Sequential Numbers
Let’s use the same data for illustration:

- Select a cell where you want to start the sequence. If it’s in a row other than the first row, you will have to modify the formula. For example, we want to start the sequence in cell A2 (which is in the second row). The formula will have to be =ROW()-1.

- Use the Fill Handle to fill in the formula to the rest of the cells in the column (either double-click or click-and-drag). Alternatively, you can copy the cell with the formula and paste it onto the selected cells.
Things to Keep in Mind When Using the ROW Function
- The sequential pattern will update if you insert or delete a row. You’ll have to copy the formula in any inserted row to reflect the sequential number in it.

- The formula works whether or not there is data in the adjacent column. It even works on blank rows.
Use the SEQUENCE Function to Enter Sequential Numbers (only for Office 365 and Excel 2021)
The SEQUENCE function is a feature only available in the newer versions of Excel (Office 365 and Excel 2021.
This function will not work in older versions.
What this function does is generate a sequence of numbers in the form of a dynamic array.
The formula to use the function is as follows:
=SEQUENCE(rows,columns,start,step)
Where:
rows – refers to the number of rows that you want to be returned in the array. For example, if you want 26 rows with sequential numbers, then enter 26 as the value for rows
columns – refers to the number of columns that you want to be returned in the array. If you only want to enter sequential numbers in rows, you don’t have to fill in this parameter
start – this will be the number that starts the sequence. The default value is 1. This parameter is optional. You only fill this in if you want the sequence to start at a number other than 1.
step – refers to the step value by which the next number in the sequence will increase or decrease. The default value is 1. This parameter is optional. You only fill this in if you want the step value to be other than 1.
If you only want to enter sequential numbers in a column, you will only have to fill in the value of the first parameter. Essentially, the formula becomes =SEQUENCE(rows).
How to Use the SEQUENCE Function to Enter Sequential Numbers
Again, we’ll be using the same data for our illustration:

- Select the cell where you want to start the sequence. For our illustration, we will be selecting cell A2.
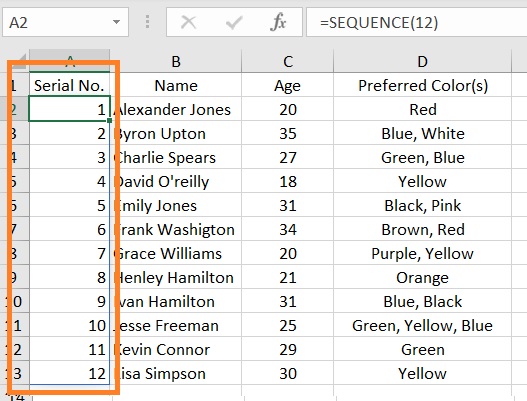
- Determine first how many rows you want to be reflected in the array. In our illustration, we want to generate a sequence of 12 numbers. Thus, we’ll enter the formula =SEQUENCE(12).

- Press the Enter key. This should result in the 12 rows in the column having sequential numbers. You’d also notice that the cells in the sequence are wrapped in a blue border. This is to signify that they are in an array.
Things to Keep in Mind When Using the ROW Function
- The sequence will not be broken if you insert or delete a new row.
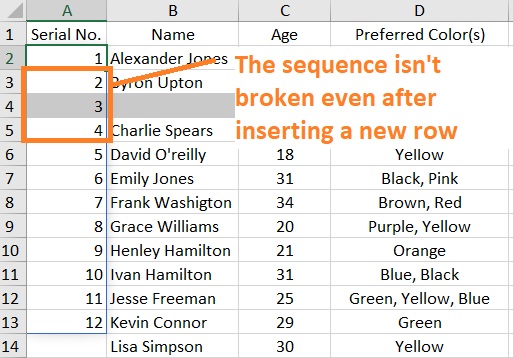
- However, if you insert a new row but it exceeds the number of items in the array, the last row/s outside the limit will have no sequential numbers. As per our illustration above, no sequential number was entered in cell A14 when we inserted a new row. This is because it is outside the 12-item limit of the array.
- To address this issue, you can use the formula =SEQUENCE(COUNTA(COLUMN)-1) instead where COLUMN refers to the adjacent column. For our illustration above, the formula will be =SEQUENCE(COUNTA(B:B)-1). With this, the sequence will be automatically updated whenever a new dataset is inserted. Note that if the adjacent column contains numerical data, use COUNT instead of COUNTA.
Convert the Dataset into an Excel Table
The last method we’ll discuss in this article is to convert the dataset into an excel table.
Among the many benefits that an Excel table gives us is it automatically inserts or updates formulae whenever we insert or delete a row in it.
That means that we don’t have to update the sequence every time we insert a new row (be it in between the table or at the end of it).
How to Enter Sequential Numbers by Converting the Dataset into an Excel Table
We’ll be using the same dataset for illustration (for the last time).

- Select the cells of the dataset. If you only want to include a portion of the dataset, then select only the cells that contain it.
- Open the Insert tab. You should find a Table button on the left side of the tab. Click it. (Alternatively, you can press the keyboard shortcut Ctrl + T). This will open the Create Table dialog box.

- In the textbox below “Where is the data for your table?”, make sure to include the cells that contain your dataset. This should be automatically filled when you selected the cells before using the Create Table function. If the dataset has headings, tick the box before “My table has headers”. Then press the OK button. This will convert the dataset into an Excel table.
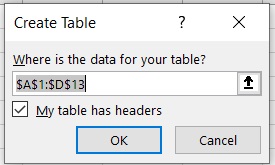
- You’ve successfully converted the dataset into an Excel table.
- To enter sequential numbers, select the cell where you want to start the sequence (cell A2 for our illustration. Enter the formula =ROW()-ROW(Table1[#Headers]). (Note that the value for Table1 isn’t constant. It should be the name of the table.)

- Press the Enter key. All of the cells in the column that is included in the table will be automatically filled in.

Things to Keep in Mind When Using This Method
- This should work wherever the table is located on the sheet
- To find out the name of your table, click anywhere on the table. Then open the Table Design Tab. You’ll find the Table Name on the left side of the tab.

Conclusion
And that wraps up the article.
Do you know of any other methods to enter sequential numbers in Excel?
Let me know by dropping a comment!
