Convert Text File Into An Excel FileUse Microsoft Excel to convert a text file Into an Excel file
Different applications will produce different types of data. For example, Microsoft Excel generates XLS files (e.g. XLS, XLSX, XLSM, etc.).
On the other hand, Microsoft Word generates DOC or PDF files. The handy Notepad generates TXT files. That’s just how it goes.
There might come a time when you have to consolidate the data generated by these different applications.
For example, you might have to open a TXT file in Microsoft Excel. It could be that the TXT file contains data that is table-ready.
And owing to its versatility in importing data, Microsoft Excel is a great option for doing this.
Furthermore, it’s generally easier to work with tables in Excel than in Notepad or another similar application.
You might be asking “how do you import or open a TXT (or text) file in Excel?”. Don’t worry.
This is why we have this article.
We’re here to learn how to do just that, to open or import TXT file(s) in Excel.
It may sound complicated, but it really isn’t. It’s quite easy in fact. And it’s only made easier by Excel’s Text Import Wizard.
Open the Text File Directly in Excel (to Convert It to an Excel File)
The first method we’ll be discussing involves directly opening the text file in Microsoft Excel.
But before that, there are a couple of things that you have to prepare.
First, make sure that Microsoft Excel is already open.
Next, know where your text file is located.
This will make things easier when you have to open it.
Convert Text File to Excel File By Opening It Directly
- In Microsoft Excel, click the File tab. This will open the File menu.

- In the File menu, select the Open option. Then click on Browse (which has an open folder icon next to it).

- In the Open window, you’ll find a dropdown menu just above the Open and Cancel buttons. By default, this dropdown menu will show “Excel Files”. Click on it, then select “All Files”. This will allow you to select text files.

- Select the text file that you want to convert to an Excel file. Click the Open button after doing so.

- This will open Excel’s Text Import Wizard. In step 1 of 3, you’re given the options of Delimited and Fixed width. If your data is separated by commas, hyphens, or other delimiters, choose the Delimited If your data is aligned in columns, select the Fixed width option. (Note: The wizard will inform you if it has determined that your data is delimited). Click the Next button after selecting the proper option.

- [Delimited] In step 2 of 3, if you selected the Delimited option, the wizard will let you choose your data’s delimiter/s. If your delimiter isn’t a tab, semi-colon, comma, or space, you can type it in the text box next to Other. Click the next button after selecting your delimiter.

- [Fixed width] If you selected the Fixed width option instead, step 2 of 3 of the wizard will let you specify the width of the columns. You can create a break line (column separator) by clicking at the desired position. To move a break line, click on it and drag it. To delete a break line, double-click on it. Click the Next button after adjusting your break line(s).

- In step 3 of 3 of the wizard, you can select the data format for each column. By default, General will be selected. If you want to delete a particular column, click on it and select the Do not import column (skip) option. The Advanced button lets you configure your number format settings. Click the Finish button if you’re satisfied with your settings.

- Your text file is successfully converted into an Excel file. From here, you can manually adjust the columns as you want.

Use Data Wizard to Convert Text File to an Excel File
Another method that you can use involves using the data wizard.
To access it, an Excel workbook must be open.
Then, open the Data tab. You have two options from here.
Either click the From Text/CSV button or click the Get Data button then select From File -> From Text/CSV.


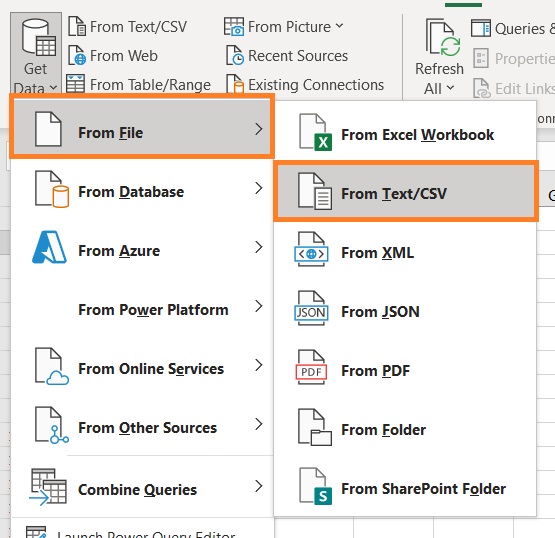
Either option will prompt you to select the Text file that you want to import.
Select the file then click the import button. From there, you can access the Data Wizard.
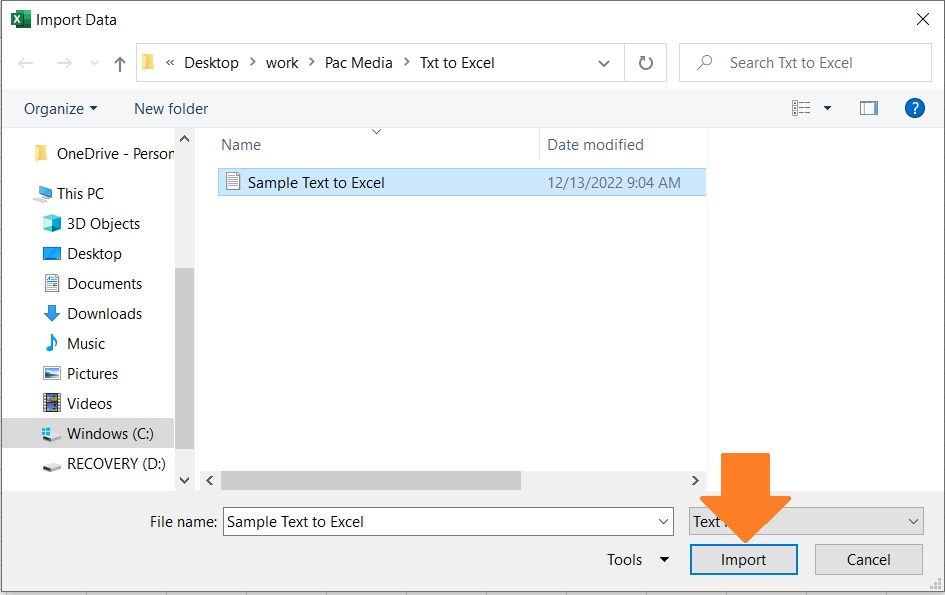
Convert Text File to Excel File By Importing It
- After clicking the Import button, you’ll be shown a preview of how the text file will be imported into Excel. If you’re satisfied with how it looks, you can click the Load button. This will import the text file into Excel as shown in the preview. If you want to edit it, click the Transform Data button.
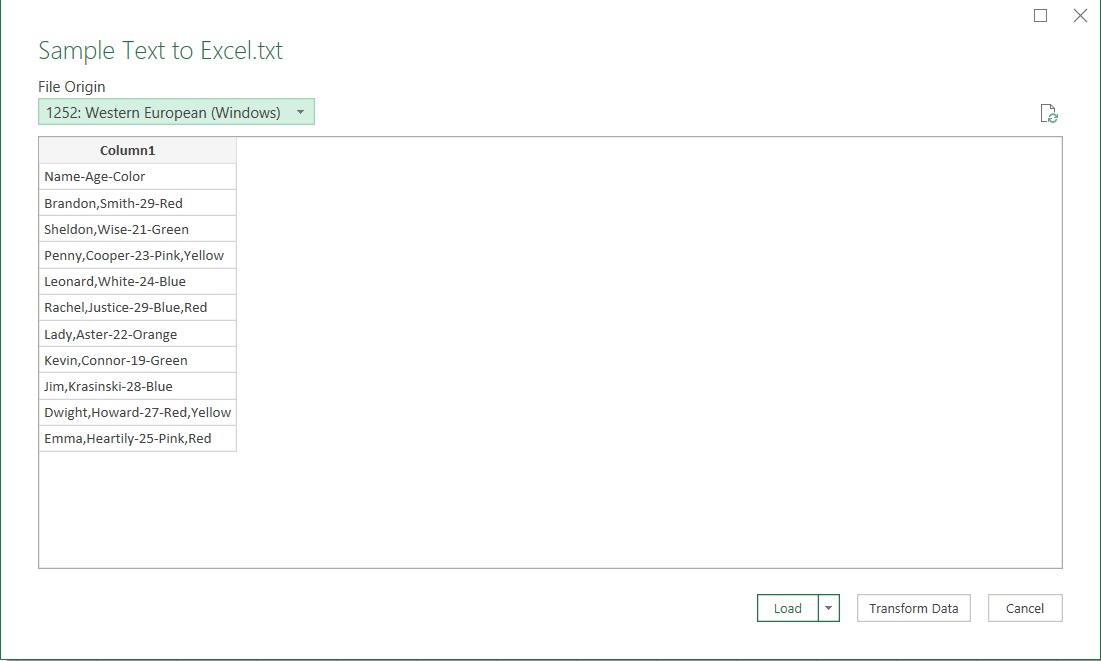
Excel’s Power Query Editor
- [Transform Data] Clicking the Transform Data button will open the Power Query Editor. In this editor, you have a lot of options for editing before importing the text file into Excel. You can choose to remove columns or rows. You can also swap them.
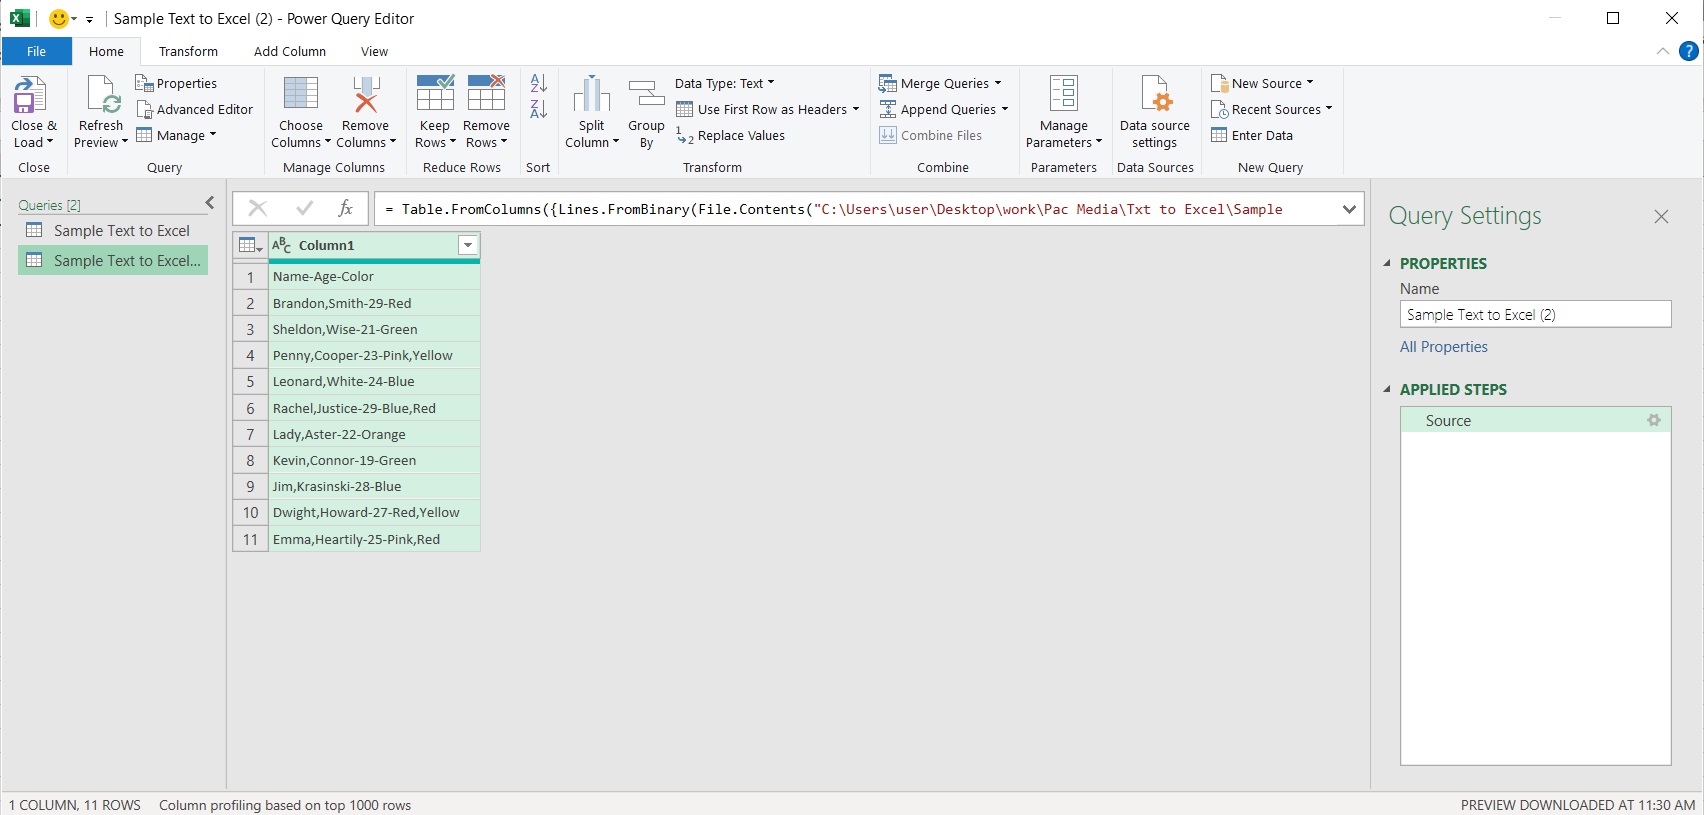
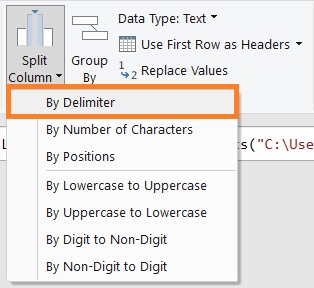
- But if you want to separate your data into different columns, click on the Split Columns button. This will show you several options such as by delimiter, by number of characters, by positions, etc. For illustration, we’ll be selecting the By Delimiter option.

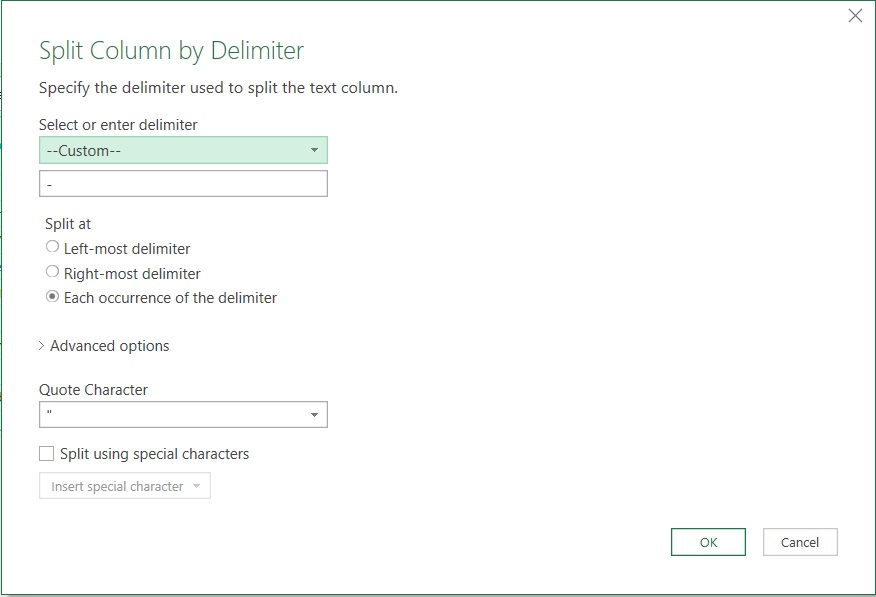
- A window will pop up. This will include options to set your delimiter. You may select or enter your data’s delimiter (which is a hyphen (-) in this case). Then, you can select where the columns split at. If you want to split for each occurrence of the delimiter, select the third option. Then you have the advanced options where you can choose to split into columns or rows as well as specify how many columns/rows should there be. When you’re satisfied with your settings, click the OK button.
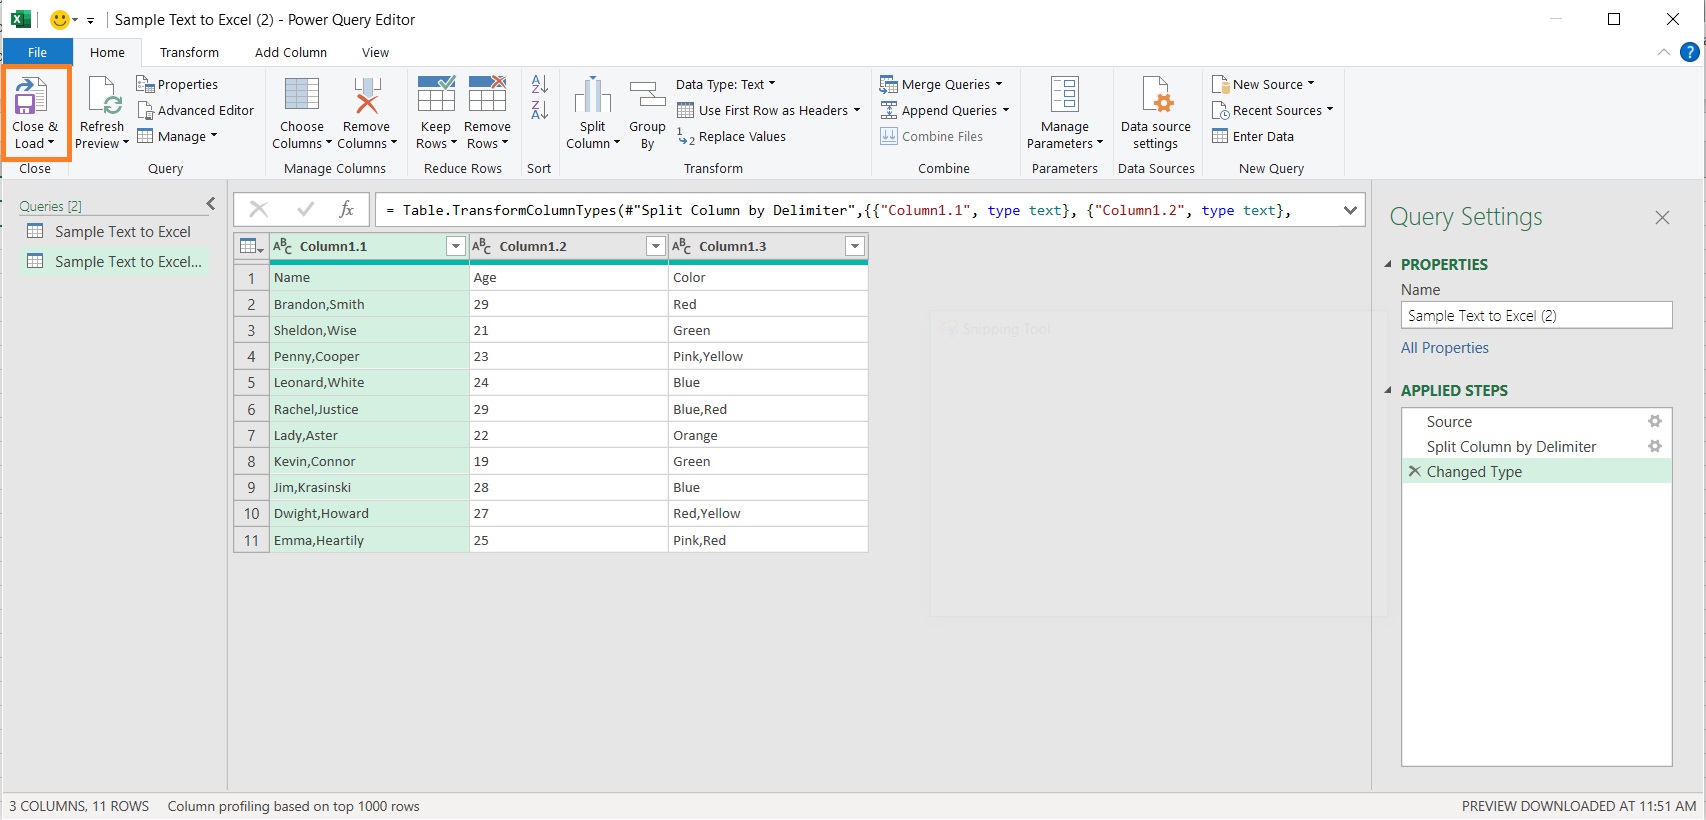
- The data will be split according to your settings. If you’re satisfied with how the table looks, click the Close & Load button. This will import the in Excel.
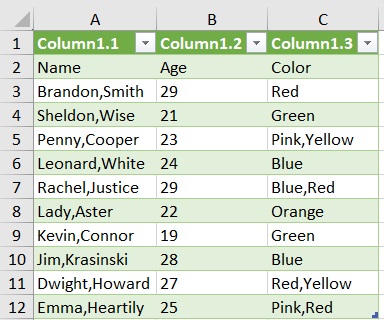
- Your text file should now be successfully converted into an Excel file.
Conclusion
And there you have it: two methods to convert a text file into an Excel file.
You really don’t have to do it manually if you know these methods.
You should be able to easily and reliably convert any text file into an Excel file anytime you have to.
