Compress an Excel File Learn how to reduce the file size of Excel Files
Depending on a number of factors, an Excel file can quickly bloat in size.
Some of these factors include the following:
- Number of sheets
- Number of cells that contain formulas
- Size of the embedded images
- Type of Excel file (e.g. .XLSX, .XLSB, .XLS)
- Number of hidden rows
- Range of cells used
Now, you might think that it’s only natural for an Excel file to have to be huge if it uses many sheets or many cells.
But more often than not, you can still reduce the size of such a file.
Depending on the Excel file itself, you can still reduce its size by 5 to 50 percent (even more in some cases). This can be pretty nifty if you often have to share your Excel files.
In this article, I’ll be showing several ways you can compress an Excel file (i.e. reduce its file size).
But before we go with the how, let’s first discuss the why. Why should you compress an Excel file?
Why should you compress an Excel file?
Truth be told, you don’t always have to compress an Excel file.
If you’re the only user of such a file, and you don’t notice any slowdown when using such a file, you may not even mind its file size.
But if you often have to share Excel files, you would know that size matters (when it comes to sharing).
Larger Excel files take significantly longer to upload and download compared to their leaner/compressed counterparts. They often load slower.
So if you often share your Excel files or experience slowdowns when using an Excel file, then you may want to compress the file size of your Excel files.
Now that we know the why, let’s proceed with the how.
Save Excel File as an Excel Binary Workbook (.XLSB)
One of the quickest ways to reduce the file size of an Excel file is to convert it to or save it as an Excel Binary Workbook (.XLSB).
Compared to the default .XLSX file format, .XLSB is smaller in size.
This is because XML files are larger than binary files.
Here are the steps to save an Excel file as a .XLSB file:
- Open the Excel file that you want to compress (if it isn’t already opened). Make sure that it’s the active workbook.
- Open the File menu via the File tab.

- In the File menu, you should see “Save As” as one of the options. Click on it.

- Alternatively, you may press F12 to open the “Save As” window.
- In the dropdown menu after “Save as type”, select “Excel Binary Workbook”. This should save the Excel file as a .XLSB file.

- And just to show the smaller size of a .XLSB file, here an image comparing it to the default .XLSX file format (for context, both these workbooks are empty which will explain the small size):

Set .XLSB as the default file format
Manually saving your Excel file as a .XLSB file can be tedious (especially if you work with a lot of Excel workbooks). If you want, you can make it so that whenever you save an Excel workbook, it automatically as a .XLSB file. To do so, you’ll have to change the default file format to .XLSB.
Here’s how to do it:
- Open the Excel file that you want to compress (if it isn’t already opened). Make sure that it’s the active workbook.
- Open the File menu via the File tab.

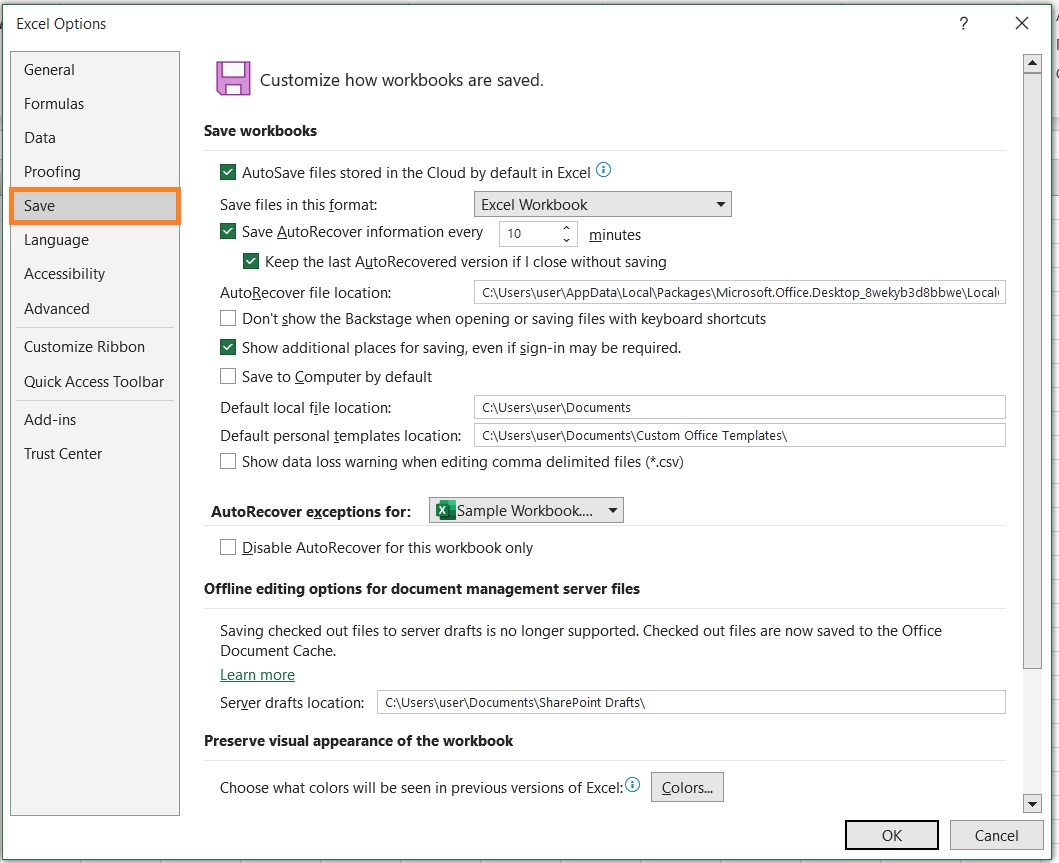
- In the File menu, you should see “Options” as one of the options. Click on it. This will open the Excel Options window.

- In Excel Options, open the Save tab.

- You should a dropdown menu next to “Save files in this format”. Click on it and select “Excel Binary Workbook”.

- Click the OK button. This will set .XLSB as the default Excel file format whenever you save a new workbook.

Things to note about .XLSB files
While it may be advantageous to use the .XLSB file format over .XLSM or .XLSX, it does have it’s limitations:
- You can’t easily tell whether a .XSLB file has macros or not. This makes it inherently riskier. For example, some other user can use the file to execute a malicious code
- XLSB files don’t work too well with third party tools. This is because XLSB files are encoded in proprietary binary code. In contrast, the XML file format is an open-source readable file format. This means that Excel files in the XML file format work better with third-party tools than those in the XLSB file format
- Power Query is not compatible with the XLSB file format.
If you don’t want to save your Excel files in the XLSB file format, then you may want to use the following methods.
Compress Your Excel File (Convert It To a Zip File)
For the next method, we’ll be zipping the Excel (send it to a compressed folder).
This can only be done outside the Excel application. Also, the Excel file that you want to compress should not be in use.
Here’s how you zip an Excel file:
- Open the folder that contains the Excel file that you want to compress.
- Right-click on the Excel File.
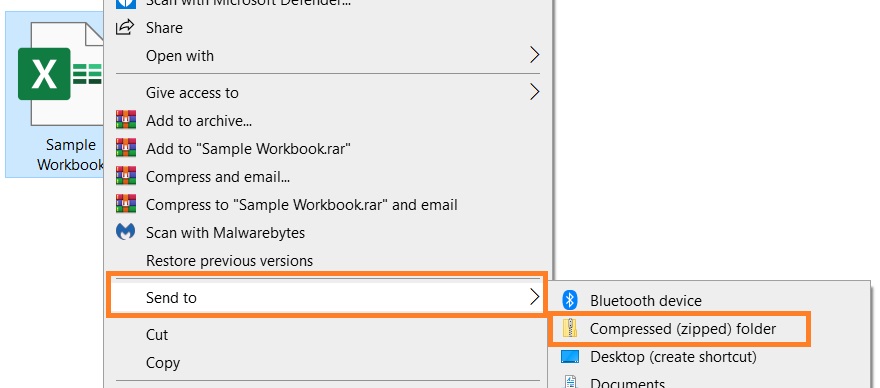
- From among the options that show up, select “Send to”. Then, select “Compressed (zipped Folder)”.

- A .zip file will be created which will contain the Excel file. This .zip file will have to be unzipped before the Excel file can be opened in Excel.
Remove Unnecessary Formulas
Cells that contain formulas are often heavier than cells that only contain values.
What I mean by that is cells that contain formulas will result in a larger Excel file size.
If you have a workbook that contains formulas that you don’t need, then you may want to remove them to reduce the file size.
I don’t mean to delete the cells. Just convert the formulas into values.
Before you do go on removing unnecessary formulas, I suggest that you make a copy of the Excel file.
- Select the entire worksheet that contains unnecessary formulas (pressing the keyboard shortcut Ctrl + A would be the quickest way to do it).
- Press the keyboard shortcut Ctrl + C to copy your selection.
- Right-click on any of the cells of your selection then press the V key on your keyboard. This will paste all the copied data as values. Thus, formulas in the sheet will be converted into values.
If you don’t want to convert the entire worksheet, you may just select the cells that contain the formulas.
- Press the F5 key to open the “Go to” window.
- In this window, press the “Special” button.
- Then in the next window that appears, select “Formulas”. Press the OK button after doing so. This will select all the cells that contain formulas.
- Press the keyboard shortcut Ctrl + C to copy your selection.
- Right-click on any of the cells of your selection then press the V key on your keyboard. This will paste all the copied data as values.
Remove Unnecessary Worksheets
The number of worksheets that a workbook contains will directly influence its file size.
The more worksheets, the larger the size will be. So if your workbook contains sheets you don’t need, you may as well get rid of them.
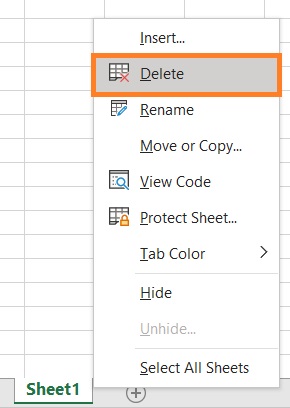
To delete a sheet, you only need to right-click on the sheet tab. Then from the options, select “Delete”.

Other Things You Can Do to Reduce File Size
Aside from the ones mentioned above, here are some other things you can do to reduce the file size of an Excel workbook:
- Avoid using volatile formulas such as RAND, TODAY, INDIRECT, OFFSET, etc. Not only do these formulas increase the file size (more than non-volatile formulas), but they also decrease the performance speed of the workbook. If you can, use a non-volatile formula instead (or copy-paste the results as values).
- Compress your images before embedding them into your workbook, especially the high-resolution ones. High-resolution images are typically large in size and can drastically increase the file size of your workbook.
- Avoid saving the Pivot Cache. When you create a PivotTable in Excel, it will automatically create a Pivot Cache.
- Remove formatting and conditional formatting of cells. If formatting isn’t necessary for your data, you may as well remove them to reduce the file size.
Conclusion
And those are the several ways you can reduce the file size of an Excel workbook.
I hope you’re able to learn from this article. Know of any other way to reduce the file size of an Excel workbook? Let me know in the comments.
