Why Is Merge and Center Grayed Out?Explained with Steps and Screenshots


When you are formatting an Excel document, you often may look to use the “Merge and Center” option to create a neat and symmetrical appearance, only to find it is grayed out and unavailable.
This can be extremely disconcerting when you need to prepare a worksheet in a hurry.
Fortunately, the answer is often simple to solve, but there could be a few different culprits at work.
Here you can find a closer look at what may be causing the “Merge and Center” button to become grayed out and unavailable.
Once you figure out what is causing the issue, we will also help you to solve it and get your “Merge and Center” button operational again.
We will also show you a few alternatives to using the merge function, which can often cause a few problems of its own when it comes to working with and modifying cells.
What Are Merge and Center?
Merge and center is an Excel feature that allows users to combine multiple cells into one larger cell and center the contents of the first cell across the now-joined cells.
Contents of cells other than the top-left most will be discarded when using “Merge and Center.”
This can work for cells across both multiple columns and rows.
All you need to do to use “Merge and Center” to merge multiple cells is to select the cells you want to merge.
Then select the “Home” tab on the ribbon and select “Merge and Center” under the alignment tab.
The selected cells will then be merged into one cell, with their contents centered across the joined cells.
It is also easy to unmerge these cells again by selecting the cell and clicking on “Merge and Center” one more time.
This will unmerge the cells returning them to their former appearance.
This means that “Merge and Center” are more than just the merge button.
It is also the unmerge button and can be used for both functions when formatting cells in Excel.
How To Find the Merge and Center Button in Excel

As described above, the “Merge and Center” button can be found on the ribbon under the “Home” tab.
It is located in the “Alignment Group” with a drop-down menu offering specific tools, including “Merge Across,” Merge Cells, “Merge and Center,” and “Unmerge Cells.”
This is similar for both Windows users and those on other operating systems. On mobile devices, it may be found under the drop-down “Alignment” menu.
For certain Excel versions designed for Mac users, it may be located under the “Format” tab in the “Alignment” group.
As you can see, no matter which version you are using, it is easy to locate just by looking for the Alignment group. In most cases, this will be under the “Home” tab.
Possible Reasons Merge and Center Is Grayed Out
When the “Merge and Center” button is grayed out, before attempting to solve the problem, you will need to diagnose why it happened.
There are a few different causes for this issue, and here they are.
The Worksheet Is Protected
When a worksheet is set to protected, Excel will not allow changes to be made to the data and formatting.
This can be a widespread bar on alterations that may make it easy to tell if this is the issue or a more limited range of restrictions which may be more subtle.
Either way, the Protected mode and the specific limitations are set by an Excel user to prevent others from making unwanted changes either by accident or intentionally.
This will often be the case for Excel files that are downloaded from the web.
Though the specific settings may vary based on the choices made by users, this mode will generally permit edits to certain portions of the worksheet and block most features, including “Merge and Center,” in order to prevent major alterations to the data within the workbook.
The Workbook Is Shared
Excel workbooks are often made to be shared with others in order to communicate important data and enable collaboration.
Since Excel 2010, users have had access to a “Shared Workbook” feature, making it easier to share and collaborate on workbooks.
This feature has largely been replaced by the newer “co authoring” feature, which enables web editing and comes with far fewer limitations.
However, there is still a good chance that the file was set to share mode in order to allow working and editing in real-time if another user is using an older copy of Excel or accidentally used the older feature.
In order to prevent users from making conflicting changes to shared workbooks, certain features are disabled when Excel workbooks are set to shared mode.
Whenever a user chooses to share a workbook with other users, it will go into a shared mode in which Excel has to track the changes each user makes to cells.
Among other limitations, this means that the program will prevent changes that may eliminate cell references and cause confusion.
There is a long list of limitations when a workbook is set to shared mode, and this includes using the “Merge and Center” feature.
If the file was shared with you by another user, chances are strong that the file is set to shared mode
The Cells Are Within a Table
One of the most common reasons the “Merge and Center” button may be grayed out is if you are working in a Table format.
You or other users may have chosen to use the “Format as Table” button to give a range of data a clean, well-formatted appearance.
However, when cells are within a table, Excel will not allow them to be merged.
As a result, whenever you select cells within an Excel table, the “Merge and Center” button will be grayed out and unavailable.
How To Figure Out Which Issue is at Fault
Now you have seen the three most common reasons that “Merge and Center” are grayed out.
Next, you need to determine which of these reasons is causing the issue to occur in your workbook. Here is how.
Check for Shared Mode
The first thing to check is if the workbook is in shared mode. For users of Excel versions other than Microsoft 365, this can be done by checking the “Share Workbook” tab.
For Microsoft 365 users, it may need to be added through the “Customize Ribbon” menu.

For other users you can do this with the steps below.
- Navigate to the “Review” tab on the ribbon.
- Select “Share Workbook” from the “Changes” group.
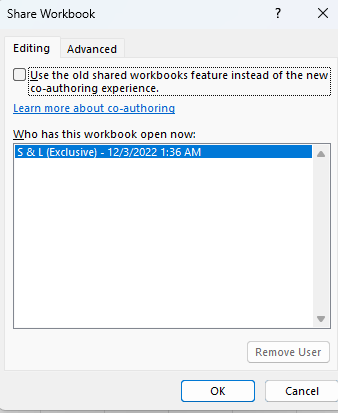
- The “Share Workbook” dialog box will open, and here you can select the “Editing” tab.
- On the top of the menu, you will see an option reading, “Allow changes by more than one user at the same time,” with some additional text. If the box next to this is checked, that means your workbook is set to “Shared.”
Check if the Workbook or Worksheet Is Protected
There are a few ways to check if protections are enabled for a workbook or sheet.
Here is the easiest method to tell.
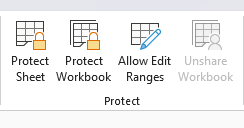
- To tell if a worksheet is protected, look under the “Review” tab and within the “Changes” group on the ribbon.

- Here there will be one of two worksheet buttons visible. If the “Protect Sheet” button is visible, this means that the sheet is not set to protect. However, if instead, the “Unprotect Sheet” is visible, then protections are active on the sheet.
- In order to determine whether or not the workbook is protected, look to the button to the right of the protect or unprotect sheet buttons.
- Similarly to the worksheet button, you will see either “Protect Workbook,” meaning that the workbook is unprotected, or “Unprotect Workbook,” meaning that protections are active.
- In some cases, Excel may show “Protect Workbook” even when protections are not active, so to double-check, simply select “Protect Workbook,” and if it prompts to enter a password, it means that it is protected.
How To Check if a Cell Is Part of a Table
In most cases, you will likely be able to tell if a table has been set by the formatting.
However, there is a way to be sure. Simply select the cells you are suspicious about and look to the top-right of the ribbon.
Look for the “Table Design” tab, which will appear whenever a cell within a table is active.
If you see this tab appear, then the cell is definitely part of a table.
How To Restore “Merge and Center”
Depending on which of the issues you found was the cause, the steps to solve the issue will vary.
Here are the steps to resolve each of the problems above.
Disable Sharing
To disable sharing, simply follow these steps.
- Navigate to the “Review” tab, and select “Share Workbook” in the “Changes” group.
- Within the “Share Workbook” dialog box, look under the “Editing” tab.
- In the box to the left of “Allow changes by more than one user at the same time,” remove the check mark.
- Click “OK,” and in the prompt that follows asking if you are sure you want to disable shared use, select “Yes.”
The shared mode will now be disabled, and if this was the only issue, “Merge and Center” will no longer be grayed out.
Disable Protected Mode
If protected mode is enabled, you can turn it off with the following steps.
- Navigate to the “Review” tab and look under the “Changes” group for the “Unprotect Workbook” and “Unprotect Worksheet” buttons.
- If either of these buttons is visible, select them. If a password was selected when the workbook or worksheet protections were engaged, you would need to determine what it was from the person who enabled protections, enter it, and select “OK.”
- Once completed, you should see the “Protect Workbook” and “Protect Worksheet” buttons visible on the ribbon. This means that protections are disabled now.
Once finished, you can navigate back to the “Home” tab and see if the “Merge and Center” button has been restored.
Convert the Table to a Range
In order to regain the use of “Merge and Center” for cells located in a table, you will first need to convert the table into normal data.
You can do this by converting the table into a range using the following steps.
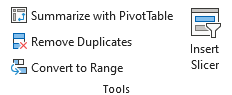
- Select any of the cells within the table and select the “Table Design” tab.
- Select, Convert to Range within the “Tools” group.
- A prompt will appear asking if you want to convert the table into a normal range. Select “Yes.”
- The table will become a normal range with table features removed but with the same formatting remaining.
With the table removed, the “Merge and Center” button should no longer be grayed out.
A Simple Alternative To “Merge and Center”
Even when “Merge and Center” are available, it is often not the best way to format cells in your Excel worksheets.
This is because it can often result in a number of issues, starting with the inability to format your data in a table, as you have seen above.
Further, you cannot sort or filter a range that includes merged cells, and often you will be unable to insert cells, columns, or rows when merged cells are present.
Fortunately, there is an easy alternative that can give you the same clean appearance as “Merge and Center” without any of the headaches.
Instead of actually merging your cells, you can instead use the “Center Across Selection” feature.
This option will display your text cleanly across the middle giving it the same appearance as if they were merged.
But, the great part is that the cells will remain separate, meaning that you can still treat them the same as you would any other cells in your worksheet.
Here is how to use “Center Across Selection.”
- Select the cells that you would like to appear merged.
- Right-click on your selected cells and click on “Format Cells.”

- In the dialog box that appears, navigate to the “Alignment” tab.
- Click on the “Horizontal” drop-down list and select “Center Across Selection.”
- Click “OK”
Your text should now be centered across the cells and appear to be merged.
Despite this, the cells will remain separate with distinct references preventing all of the normal problems with merging cells.
Conclusion
Now you have seen why the “Merge and Center” button may be grayed out on your Excel workbook.
Now with the information above, you should be able to diagnose the cause and then solve the issue following the steps we have provided.
Then, you can get back to formatting your cells however you like.