Excel Insert Column Option Greyed Out – 7 Simple SolutionsStep by Step Instructions with Screenshots
Excel is a powerful spreadsheet software that allows us to store, organize, and analyze data in an extremely flexible manner.
A key part of this flexibility is the ability to add, remove, and manipulate columns, but in some circumstances, the insert column option may be greyed out and unavailable.
The fact is that this can occur due to multiple possible causes.
This includes sharing a workbook, setting it to protect, and changing the display options, among other potential reasons.
Here we will take a look at the possible causes of this issue and how they can be solved.
Reset the XLB File
One of the most common issues that cause the insert column feature to fail is an error with the .xlb file stored in the AppData profile.
Resetting the file can eliminate many of the errors that can cause this to occur and is by far one of the most effective solutions.
Here is how to reset your .xlb file.
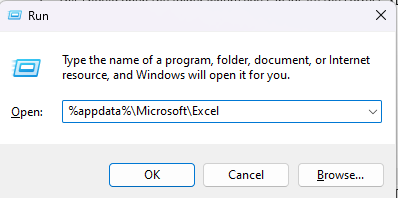
- Press the Windows and R keys simultaneously on your keyboard to open the “Run” window and enter “%appdata%\Microsoft\Excel” to locate the file.

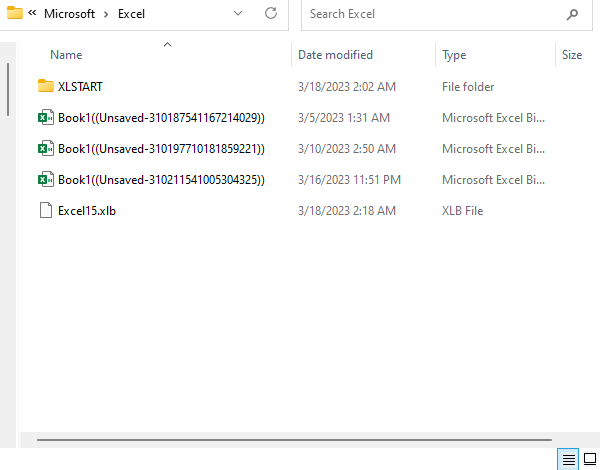
- This should open the folder where you can locate the correct .xlb file.

- Modify the file extension from .xlb to .xlb_old.

You can now reopen your file and check if the problem is fixed.
In many cases, this will be enough to restore the “Insert Column” feature.
Turn Off the Protected Workbook or Protected Worksheet Setting
When a workbook or worksheet is set to protect, a large number of features are automatically disabled to prevent unwanted changes to its contents. This is a common reason for the “Insert Column” button to be greyed out and unavailable.
In order to solve the issue, we simply need to turn off the protected setting. Simply follow these steps to do this.
- Navigate to the “Review” tab, and within the “Protect” group, look for “Unprotect Sheet” and a grey-shaded “Protect Workbook.”

- If instead of these settings, you see an unshaded “Protect Workbook” or “Protect Worksheet,” these settings have not been turned on, and you will need to consider other potential issues that may be at fault.

- If the project worksheet or workbook settings have been engaged, click on the icons to turn them off and then restart Excel.
Once the project settings are disabled, and Excel is restarted, the insert cell column option should once again be available.
Make Sure a Column Is Selected

In order to insert a new column, an existing column must be selected; if, instead, for example, a row is selected, then the insert column option will not be available. If the insert column option is greyed out, then ensure that a column is selected and not a row.
Ensure Cell Edit Mode Is Not On

This is perhaps the easiest issue that can cause the “Insert Sheet Columns” icon to be greyed out and unavailable.
When you have selected a cell and entered “Cell Edit” mode, which allows you to change a cell’s contents, the insert columns feature is disabled.
All you need to do to solve this is to exit the “Cell Edit” mode, which is as simple as hitting “Esc” on your keyboard.
Check Display Options

One possible cause for the insert columns option to be unavailable is if the display options are not set to show certain objects.
This can easily be checked and solved by accessing the “Excel Options” window. Here is how.
- Select the “File” tab from the ribbon, and then on the bottom left-hand side, select “Options.”
- This will open the “Excel Options” window, and here you will navigate to the “Advanced” tab on the left-hand side.
- Scroll down to “Display options for this workbook” and select “All” under the “For Objects, show:” option.
- Select OK.
Now you can look to see if the “Insert Sheet Columns” option is available from the ribbon.
Check If Workbook Is Shared

Excel’s legacy “Shared Workbook” feature would cause many features to be disabled, including the insert column option.
In order to solve this, simply navigate to the “Review” tab and select “Share Workbook.”
This will open a dialog box where depending on what version of Excel you have, you can either choose to disable the legacy sharing setting or choose to uncheck the “Allow changes by more than one user at the same time” option. Once finished, select “OK.”
Check If Excel Add-ins Are at Fault

There are many Excel Add-ins that can bolster your efficiency and make it easier to organize and work with your data.
However, some Add-ins can have unexpected side effects when it comes to your settings, and they could be causing your “Insert Sheet Columns” to be unavailable.
Depending on how many Add-is you have installed, this could be more or less easy to solve because to solve it, you will need to remove Add-ins one by one and check whether this solves the problem. To do this, select the “File” tab from the ribbon.
Next, select “Options” from the lower-left-hand side, and this will open the “Excel Options” window.
Navigate to the “Add-ins” tab and begin removing installed “Add-ins” one at a time to check if they are causing the issue.
Once you figure out which, if any, are causing it, simply remove them to solve the problem.
Conclusion
Inserting columns is an important feature for organizing and working with data in your worksheets.
When it is disabled, this can make it difficult to do what you need.
Here we took a look at several possible causes for this issue and how you can quickly solve them and get back on track.
