How to Insert Checkbox in ExcelEasy Step-by-Step Guide


Excel is a powerful tool that can be used for a wide range of purposes, from statistics and engineering to data entry and even making lists.
For the latter two of these tasks, an interactive list with a check box can make the job much easier.
When performing data entry, it is common to ask people to provide yes or no answers, and in this case, a check box can provide for easier data entry and a more professional appearance.
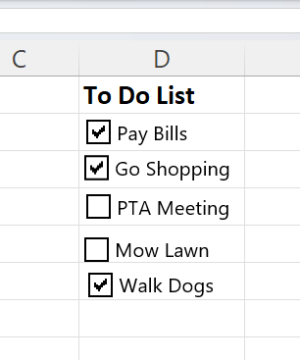
When ticking off items on a list, there simply is nothing easier than checking a box.
Fortunately, Excel offers an option for adding a checkbox to your workbooks, allowing you to create interactive lists.
It can be a bit challenging to get started adding interactive components like these to your spreadsheets, But once you figure out how, it is easy to work with.
Here is how.
Adding the Developer Tab
In order to add a checkbox, you will need to have the “Developer” tab added to your ribbon.
If you don’t have it added yet, you will need to add this tab first in order to get started.
To do this, click on the “File” tab, and on the menu that appears, look to the lower-left-hand side and select “Options.”
This will bring up the “Excel Options” menu, and here you will select the “Customize Ribbon” tab.
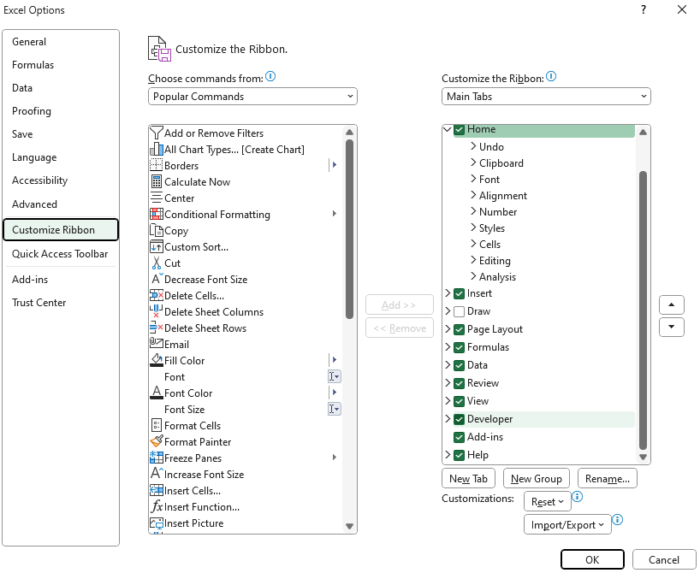
This will bring up the “Choose commands from” and “Customize the Ribbon” options. Under the “Customize the Ribbon” list, you will see the “Developer” option.
Place a checkmark in the box beside this option and select “OK.”
You should now have the “Developer” tab visible on your ribbon.
How To Insert a Checkbox in Excel
With the “Developer” tab on your ribbon, now it is time to insert a checkbox.
The first step is to select the “Developer” tab and select “Insert” from the “Controls” group.
This will bring up a drop-down list, and on the top row, third from the left is the “Check Box” option that you want to select.

Next, click inside the cell where you would like to place a checkbox.
You can drag the check box to place it where you would like and to change the text.
You can right-click on the check box and select “Edit Text” in the menu that appears.
You can repeat this process as many times as you need to add all of the check boxes you need.
Next, you may wish to link the check box to a cell to track entries and display results.
How To Modify Value and Link a Checkbox to a Cell
Now that they are placed, you may wish to make additional changes to your checkboxes, such as setting a default value or linking them to a cell.
You can do this by using “Format Control” with the steps below.
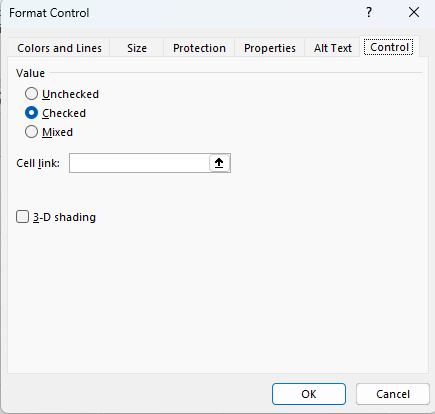
- Right-click on the check box you would like to make changes to and click on “Format Control.”
- This will bring up the “Format Control” dialog box. Navigate to the “Control” tab, and here you can set a default value as well as link the checkbox to a cell reference.
- First, under “Value,” you can set the default value for the check box. If you select “Checked,” the file will set the box to start with a checkmark, and if you select “Unchecked,” it will start blank by default. You can also set “Mixed,” which will set the checkbox to an empty state that is neither checked nor unchecked until action is taken.
- Next, you can set a “Cell link” that will allow you to display “TRUE” or “FALSE” when the check box is selected or cleared, respectively. If the status is mixed, it will display neither result until action is taken. You can either enter the cell reference manually or select the cell in order to set the reference.
Once you are finished adjusting the settings, you can select “OK” to exit the dialog box and view your changes.
How To Quickly Add Additional Check Boxes
Instead of adding more checkboxes manually through the developer tab, there are a few alternative methods you can use to add more checkboxes to your worksheet.
There are two easy methods you can use to duplicate checkboxes, including using the “Copy” and “Paste” functions as well as the “Fill Handle” feature.
To add more checkboxes this way, all you need to do is right-click on any checkboxes you have placed through the “Developer” tab and select “Copy,” and then you can right-click elsewhere on the worksheet and select “Paste” to place another checkbox.
From here, you can simply drag to place your new checkboxes anywhere you would like.
You can repeat this process as many times as you need to create the number of checkboxes you need.
However, keep in mind that though this method involves fewer steps than using the developer tab, if a checkbox is already linked to a cell, the new cells will likewise be linked to the same cell reference.
You can modify this by using the “Format Control” dialog box in the same way you set the cell link for the original check box.
When a checkbox is present in a cell, you can also use the “Fill Handle” to create copies of the check box in adjacent cells.
To do this, first select the cell with the check box in it that you would like to copy.
Next, hover your cursor over the bottom right of the selection area until it turns into a small plus icon.
When this happens, click and drag your cursor down to create copies of the check box in the adjacent cells.
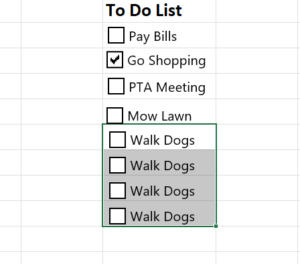
As with the copy and paste method, these cells will be linked to the same cell as the original if the first cell was linked.
You can adjust the cell references of these new cells manually if it is needed.
How To Align Checkboxes in Excel
After adding a row of checkboxes, you may find that they don’t line up perfectly once they are dragged into place.
This is normal, and fortunately, Excel provides a way to get them lined up perfectly.
Here is how:
- Hold down “Ctrl” and click on each of the check boxes to select them all.
- Navigate to the “Page Layout” tab, and under the “Arrange” group, select “Align.”
- This will bring up a drop-down list offering different options for aligning your selected items.
- To place your list in a straight line, select “Align Left,” and to align them vertically, select “Distribute Vertically.”

This should leave your check boxes looking aligned and professional.
How To Delete Checkboxes in Excel
If you find that you do not want some of the check boxes you have added, it is easy to delete them.
First of all, to remove a single unwanted check box, simply right-click on it to select it and then hit the “Delete” key on your keyboard.
This will remove it from the worksheet.
If you want to remove several checkboxes at the same time, hold down the “Ctrl” key and left-click on each of them.
This will allow you to select all of them before hitting “Delete” to remove all of them at once.
However, for large worksheets with a number of checkboxes spread about, it may be inconvenient to individually select them.
In this case, you can use the Selection Pane to identify and delete them without all the scrolling. Here is how:
- Navigate to the “Home” tab and select “Find & Select” under the “Editing” group.
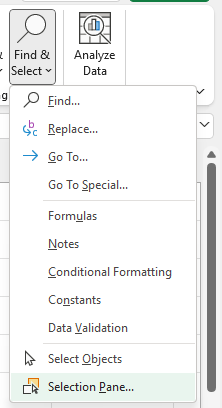
- This will bring up a drop-down list where you can select “Selection Pane.”
- This will bring up the “Selection” screen, where you will see each of the objects present in your worksheet, including checkboxes.

- You can click on any of the check boxes to display their location in your sheet. Once you know which you would like to remove, hold down “Ctrl” while selecting each of the check boxes you would like to remove and hit “delete” to remove them from your worksheet.
Conclusion
Check boxes can be an incredible tool for upgrading your Excel worksheets.
These are amazing tools for both data entry and creating functional and easy-to-use lists.
Whether it is for graphing, checklists, or simply your daily to-do list, check boxes can offer a large amount of utility.