How To Create a Data Entry Form in ExcelQuickly and Easily Input Data into Worksheets
One of Excel’s most common uses is for data entry, and most people do this by manually selecting cells one at a time to add each entry.
However, this task is not only time-consuming but is also prone to errors that can make stored data less useful and result in flawed results when an analysis is based on this data.
Fortunately, Excel provides a better way to get the job of data entry done with less time and fewer errors.
This is with data entry forms which allow users to input data for one record at a time without the distraction of endless columns and rows.
All it takes is a small upfront investment of time.
What Is an Excel Data Entry Form?
Microsoft Excel provides an easy and fast way to input data into worksheets called data entry forms.
Ordinarily, to enter data into a worksheet, users will simply type data directly into cells, and this will require moving back and forth between columns and rows, increasing the risk of mixing up rows and making other mistakes.
However, with a data entry form Excel allows users to enter data in a different and more user-friendly format where one data point can be entered at a time in a separate dialog box.
This can help to prevent data entry errors and speed up data entry.
In addition to adding new records, records can be updated and edited as necessary.
Once completed, the data will then be displayed in a normal manner allowing it to be viewed normally.
However, one limitation is that until the data entry form is closed, a worksheet cannot be printed.
How To Add the Data Entry Form Tool
The data entry form tool has been available since Excel 2007; however, it is not displayed unless it is added.
As a result, the first step to using this tool is adding the data entry form tool to either the Quick Access Toolbar and/or ribbon.
Here is how:

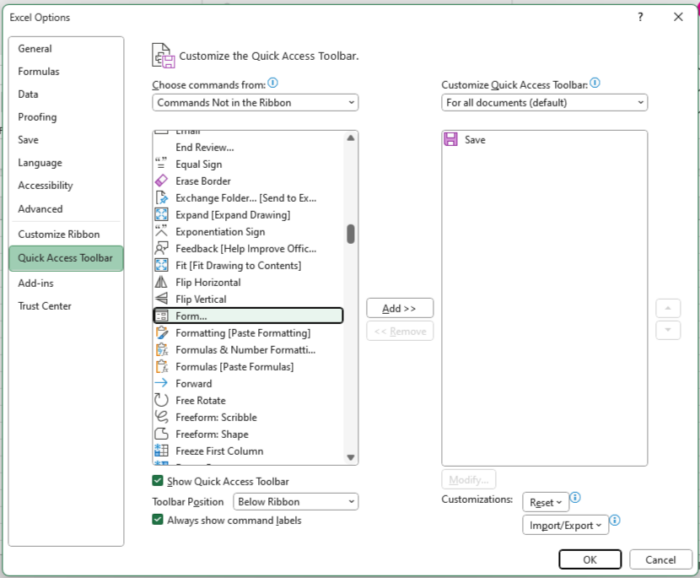
- Right-click on the Quick Access Toolbar and select “Customize Quick Access Toolbar.”
- This will open “Excel Options,” and in the “All Commands” box, find the “Forms” option. If you have difficulty locating this option, change the “Choose commands from” option to “Commands Not in the Ribbon.”
- Once you locate the “Forms” option, select “Add” and then “OK,” and the “Forms” command should now be available in the Quick Access Toolbar.
If you prefer, you can follow essentially the same steps to add the “Form” option to the ribbon by using the “Customize Ribbon” option on the “Excel Options” menu instead.
How To Create a Data Entry Form
Now that the “Form” option is added to your Quick Access Toolbar or ribbon, you can begin creating data entry forms, and here is how.
- If you are creating a data entry form for a brand new data set, start by creating appropriate column headers at the top of your worksheet as you normally would. If you already have an established data set and are just creating a data entry form to create inputs, you can skip this.
- With the column headers in place at the top of the rows, convert the range into a table by selecting the columns and then clicking “Insert” and “Table” from the “Tables” group.

- A dialog box will appear, which should include the correct range. If so, you can select “OK,” and Excel will create a table with the information in the range.

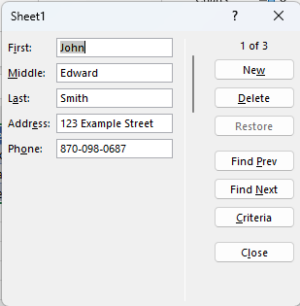
- With the table in place in your worksheet, you can now begin entering data using the “Form” button. Select “Form” from your ribbon or Quick Access Toolbar, and Excel will open a window with an automatically created data entry form with fields for each of your column headings.

- You can now enter data into your spreadsheet using your data entry form. Whenever you want to add data to the table, simply select any of the cells in the table and select the “Form” button. This will open a pop-up box with the prepopulated fields, which you can use to enter your data into the table. Once your data is entered into each of the fields, you may select “New” to input the data into your table.

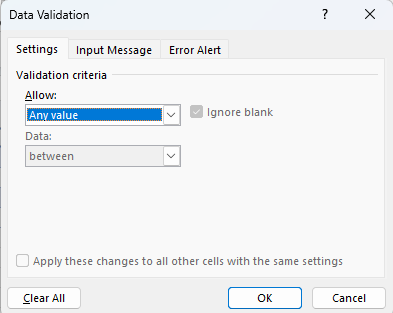
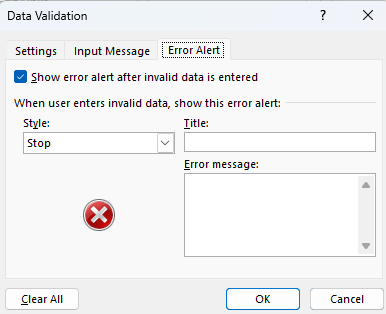
- You can help to ensure the accuracy of data entry by adding conditions and validations. To use this, you can select a cell or range and navigate to the “Data” tab and select “Data Validation” from the “Data Tools” group.

- In the dialog box that appears, you may select different options for ensuring the accuracy of data inputs by adding restrictions and error alerts that will help to ensure the accuracy of your entered data and prevent mistakes. This can include customized error messages for when your data exits preset criteria and restrictions on text length, date ranges, and other options.
How To Search and Navigate Records Using Excel Forms
By selecting a cell and clicking the “Form” button, you can open the dialog box to add new data, but it can also be used to navigate and search records as well.
By using the “Find Prev” and “Find Next” buttons, you can navigate records one by one.
It is also possible to navigate records that meet certain defined criteria by using the “Criteria” button.
By selecting this button, you can then enter a word into any of the fields and then click “Find Next.” This will then navigate to the next record that contains the search term within the field.
By using a wildcard character surrounding a search term, such as “*” in a search field and selecting “Find Next,” Excel will search your table for any record that contains the search term in any of the fields.
Logical operators including less than <, greater than >, equal to “=,” and not equal to “<>” symbols can be used as well to search records.
For example, in order to view records that have a date prior to June 31st, 2022, the search term “<1-June-2022” would be entered into the appropriate criteria.
How To Update Existing Entries
If an entry needs to be updated or was entered incorrectly, the navigation and criteria buttons can be used to locate the record, and the fields can be updated with the correct data.
Once this is done, simply pressing “Enter” will update the record in the table.
Suppose an accidental change has been made to a record.
The “Restore” button can be used to return the entry to its original state.
If you have already hit the “Enter” key on your keyboard, “Undo” can still be used to reverse the change.
Why Won’t the Data Entry Form Open?
There are several reasons that the data entry form may be unable to open.
These include:
- Too Many Fields in the Table. Excel can only create a data entry form for tables up to a maximum of 32 columns. If a table includes a larger number of columns, then Excel will return an error message stating, “Too many fields in the data form.” In order to continue creating a form, you will need to reduce the number of columns or break the table into multiple smaller tables by adding empty columns and creating multiple distinct data entry forms.
- Table or Database Cannot Be Extended. When Excel returns an error code stating that a list or database cannot be extended, this means that data located below the table is in the way and that by inputting a new record, this data would be overwritten. This error is easily solved by removing data located below the table to provide the table room to expand. If you do not see any data, simply use the clear all command to remove any non-printing characters or other difficult-to-detect inputs that may be causing the error.
- Command Cannot Be Applied to the Selected Range. If Excel returns an error message stating that “This can’t be applied to the selected range,” then it is likely that the active cell was not located inside of the table. Select another cell inside of the table and select the “Form” button again.
Conclusion
A data entry form can greatly simplify the time-consuming task of entering data one cell at a time by providing a user-friendly way to input data into tables.
This allows data to be entered one field at a time, reducing input errors.
Here you have seen how to add the “Form” button and convert a range of data into a table.
From there, we have shown you how to use the “Form” tool to create a data entry form and use it to add new entries, search existing records, and edit records to update or correct data.
By using these instructions to create and utilize data entry forms, you can greatly improve the data entry process and help ensure the accuracy of recorded data.

