Convert Serial Numbers to Dates in Excel2 Simple Methods
Many of us store dates and times in Excel regularly for planning schedules and storing records.
However, you may have been entering a date like normal and find it suddenly turns into a confusing serial number like 44011 instead of the typical date format you are using.
Don’t panic because this is completely normal, and even if you didn’t know it, all of your dates are recorded as serial numbers, just like this one under the surface.
In the back end of Microsoft Excel, each date is recorded as a unique serial number, starting from 1, which represents 01 Jan 1900.
For each day, Excel moves the number forward by one digit, which allows each date to naturally possess a unique serial number.
This is extremely useful because it allows users to effortlessly perform operations such as adding and subtracting dates, and Excel will always be able to display the correct date information.
However, despite the convenience it offers in running operations, you may not be so happy displaying a serial number instead of your date.
Fortunately, it is not difficult to convert these serial numbers back into ordinary dates, and here we will look at two particularly simple methods to help you do just that.
So, let’s get started converting serial numbers to dates in Excel.
How To Convert a Serial Number to a Date Using the Ribbon
The simplest way to change the formatting of a date from a serial number to a typical date format is to change the formatting in the cell.
Fortunately, Excel makes this easy to do right from the ribbon with a basic selection of common date formats.
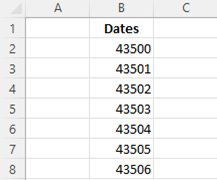
For example, consider this list of serial numbers which we would like to display as dates.

Here are the steps we need to follow to do this:
- Select each of the cells containing serial numbers you would like to convert into a date format.

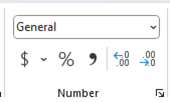
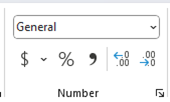
- Navigate to the “Home” tab, and within the “Number” group, select the Formatting box.

- This will open a drop-down list with a variety of formatting options. Choose from either the Short or Long Date options depending on which format you would prefer.

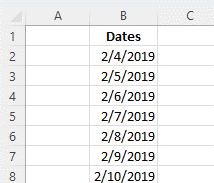
Now your dates should no longer be serial numbers. Instead, they should be formatted in the date format you have chosen.
If you see ##### instead of dates, this just means the column is not wide enough. Simply increase the width of the column, and dates should appear.
Keep in mind that the change in format has not affected the value of the cells’ contents, only their appearance.
In addition, Excel will format the short date based on your system settings.
This means that, for example, if your system’s region is set to the U.S., it would be formatted in Month/Day/Year, whereas for U.K. residents, it would be Day/Month/Year.
As you have seen, this is an incredibly simple and straightforward way to change serial numbers into dates, but there are a few drawbacks.
First of all, it only offers two options for formatting dates. Often, neither of these may be the format you would prefer.
In addition, there are no ways to display the date and time from the formatting settings on the ribbon.
You can choose to display either one of these, but not simultaneously. Fortunately, there is another simple way to change serial numbers into a date format that offers more flexibility.
How To Change Serial Numbers Into Dates With the Format Cells Dialog Box
If the formatting options available on the ribbon do not offer the flexibility you need, then often going a few steps further and using the format cells dialog box is the better option.
Using the same serial numbers as in the last example, here is how you can access and use this option to adjust your formatting.

- Select the cells with serial numbers you would like to convert into a date format and navigate to the “Home” tab.

- Within the “Numbers” group, select the small arrow on the bottom right. This is the dialog box launcher that will open the “Format Cells” dialog box.

- Within the ”Format Cells” dialog box, navigate to the “Number” tab, and in the list of “Category:” options, choose “Date.”
- Here you will find a wide array of different formatting options you can choose from in addition to those offered on the ribbon. If you find one that suits you, select it and hit “OK.”

- Suppose none of the options here suit your needs. That is okay. Under “Category:” navigate to “Custom.” Here you can use the “Type” box to enter your preferred format. Once you have finished, select “OK.”
With custom formatting within the “Format Cells” dialog box, you have virtually complete control over how your date is displayed.
Here are the formatting codes you can use to choose how your data will be formatted.
| Date Formatting Code | How it Formats the Date |
| M | Shows the Month as a number from 1–12 |
| mm | Show the Months as two-digit numbers from 01–12 |
| mmm | Shows the Month as three-letter as in Jan–Dec |
| mmmm | Shows the Months full name meaning January–December |
| mmmmm | Shows the name of the Month first, such as January, February… |
| D | The days are shown as numerals 1,2, 3,… |
| Dd | The days are shown as 1-31. |
| ddd | The days are displayed as Sun through Sat. |
| dddd | The days are displayed as Sunday–Saturday |
| Yy | The Years are shown as 00–99 |
| yyyy | The Years are displayed as 1900–9999 |
By entering these codes into the “Type:” box, you can design a custom format in order to display your date however you would prefer.
Final Thoughts
Here you have seen how you can change serial numbers into a date format.
By using the ribbon, you can convert serial numbers into one of two basic date formatting options in only a moment.
By using the “Format Cells” dialog box, you can use one of many predefined date formatting options or even create your own custom formatting to display your date however you choose.
No matter which option you prefer, either of these options can help you get it done quickly and easily.
