Process for Comparing Two Excel Documents to Identify DifferencesHow to Guide with Screenshots
This guide will introduce you to several techniques for comparing Excel documents and detecting disparities between them.
You will discover how to view two windows in Excel concurrently, construct the difference report with Excel formulas, apply conditional formatting to highlight discrepancies, and other useful methods.
If you possess two nearly identical workbooks in Excel, or alternatively, two editions of a workbook, the initial step that you would normally do is compare the files to discover discrepancies, and then combine them as one file.
Moreover, comparing workbooks can aid in identifying potential issues such as broken links, inconsistent formulas, duplicated records, or incorrect formatting.
Now, let’s examine a range of techniques to make a comparison between two sheets in Excel or complete workbooks and detect any differences.
Different Approaches to Make a Comparison Between Two Files in Excel by Displaying them Next to Each Other
Suppose you possess moderately sized workbooks and possess a keen eye for precision; in that case, this efficient and straightforward method for comparing Excel files may suit your needs.
I’m referring to the mode “View Side-by-Side” which permits you to position two windows in Excel adjacent to one another.
This technique can be employed to make a visual comparison in the identical workbook between two Excel sheets or even two workbooks.
Examine and identify disparities in two Excel workbooks
Assume you have two months’ worth of Sales Reports and need to examine both records to gain insights into which products yielded higher sales this month, as opposed to the previous month.
To launch two files simultaneously in Excel, employ the following process:
- Proceed to launch the workbooks that are up for comparison.
- Access the following tabs in order: View > Window > View Side-by-Side.
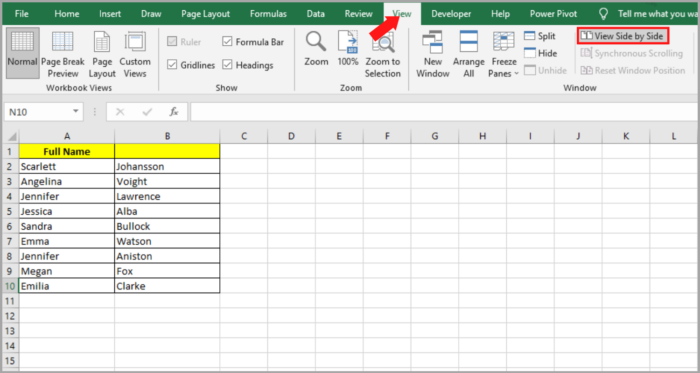
The default layout consists of two independent Excel windows located side by side.
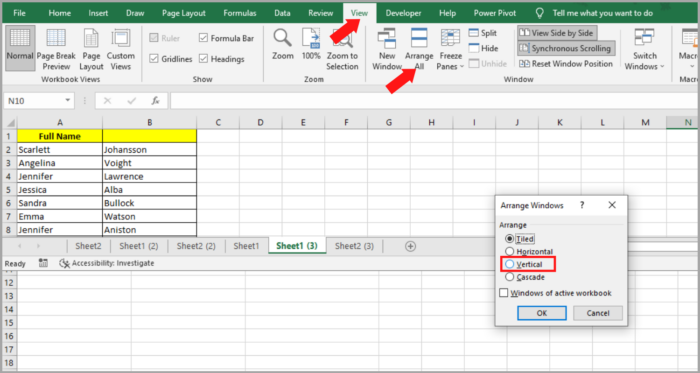
To opt for a vertical division of the windows in Excel, choose the button “Arrange All”, and click on the “Vertical” selection:
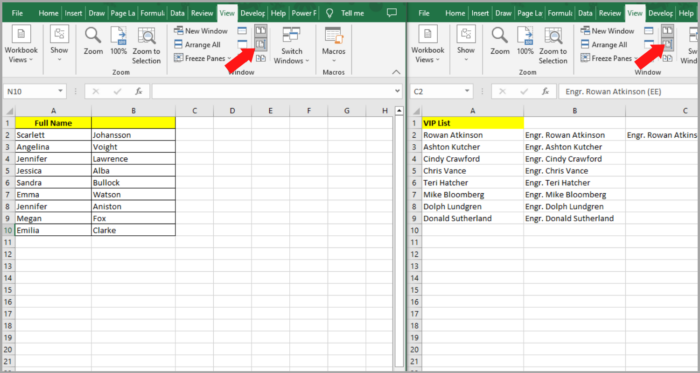
If you desire to peruse two worksheets at the same time to make a comparison between the data per row, ensure that feature “Synchronous Scrolling” is enabled.
This option is located when you click on the tab View > Window > View Side-by-Side, and is frequently activated automatically upon enabling View Side-by-Side manner.
Organize Numerous Windows in Excel Side-by-Side
Open any Excel workbook you wish to compare, then click the View Side by Side option to see more than 2 Excel files at once.
You may choose which files to display alongside the current worksheet in the Compare Side by Side dialog box, which will then appear.

To examine all accessible Excel files simultaneously, do the following: choose the “Arrange All” button under the Window group on the View tab.
Then, select the type of layout you require: horizontal, tiled, vertical, or cascading.
Comparison of Two Sheets Within a Workbook
Occasionally, the two sheets you intend to contrast might be located within a similar workbook.
To see both worksheets aligned together, here are the steps to do it:
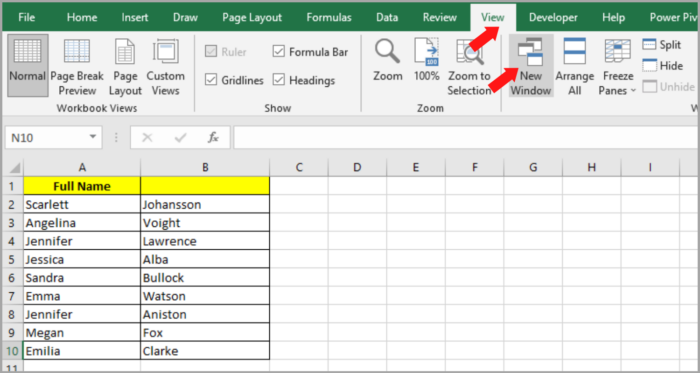
- Launch the Excel file > View > under the Window group, and press on New Window.

- In another Window, a similar Excel file will be opened.
- Click on the button in the Ribbon to activate the alignment view.
- In the primary window, choose Sheet 1, and in the subsequent window, choose Sheet 2.
Comparing Values of Two Sheets in Excel for Discrepancies
The easiest method to contrast Excel data enables the detection of cells with distinct values, resulting in a fresh worksheet having a difference report.
Differentiate two sheets in Excel by starting with opening a blank sheet and entering the below formula:
| =IF(Sheet1!A1 <> Sheet2!A1, “Sheet1:”&Sheet1!A1&” vs Sheet2:”&Sheet2!A1, “”) |
Because we are utilizing relative cell references, the calculation will change depending on where the row and column are located.
The formula in cell A1 will therefore compare cells A1 in both sheets (Sheets 1 & 2); the formula in cell B1 will similarly compare cells B1 in both sheets; etc.
This will produce a result similar to the following:

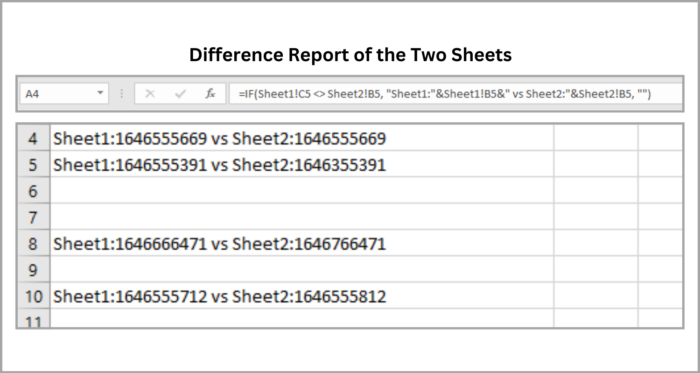
The formula contrasts the two sheets, highlights cells with different values, and shows the variations in the relevant cells, as seen in the screenshot above.
It’s important to keep in mind that dates (like those in cell C4) in the difference report are represented as serial numbers, which could not be particularly user-friendly when comparing their differences.
Explain How to Use Conditional Formatting to Emphasize Discrepancies Between two Spreadsheets
Emphasizing the difference between two sheets by highlighting it with a color of your choice can be done by employing conditional formatting.
Here’s how you’ll do it:
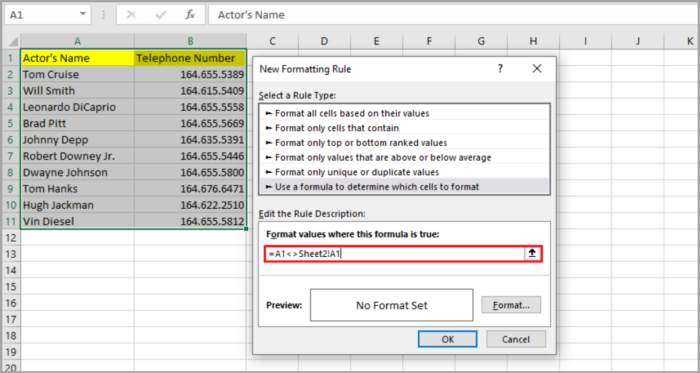
- Begin by selecting all the cells used in the relevant worksheet. Click on the top left cell in the range used (A1) and press the keys Ctrl + Shift + End to expand the cells selected up to the last one.
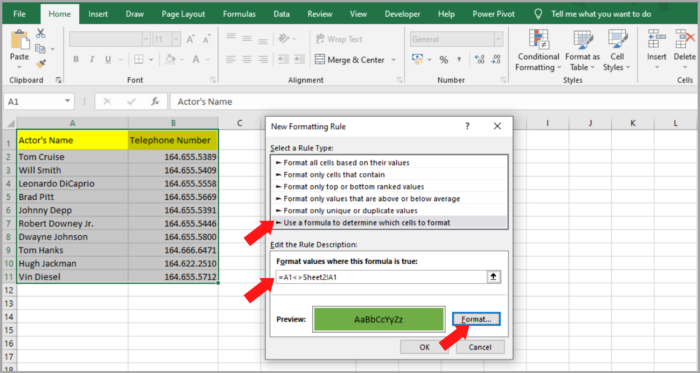
- Next, navigate to the Styles group in the Home tab and select Conditional Formatting, and then New Rule. Enter this formula: =A1<>Sheet2!A1
Assuming “Sheet2” as the title of the sheet being compared.
Upon completion, cells containing distinct values will be visually accentuated with the chosen color.
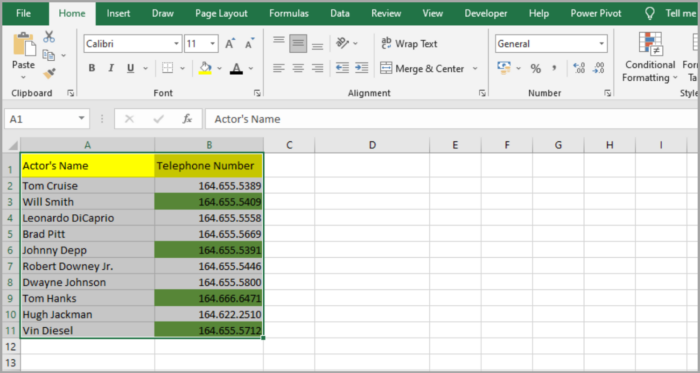
It is apparent that comparing Excel sheets with the use of conditional formatting or formulas is a straightforward process. Nevertheless, these techniques may not be ideal for comprehensive comparisons due to the subsequent drawbacks:
- The methods can only detect value disparities but are incapable of contrasting the formatting in cells or formulas.
- Any inserted or removed rows or columns in a single sheet will cause all the next rows or columns to be labeled as discrepancies, and detecting newly added or deleted ones is not feasible.
- While the techniques operate on a sheet level, they are inadequate in identifying structural inconsistencies in the workbook, such as additions or deletions of sheets.
Analyze and Integrate Duplicates of a Collaborative Workbook
The function Compare and Merge is a helpful tool for integrating multiple editions of an Excel file.
This feature is particularly valuable when several individuals work together on a similar workbook in Excel, as it allows for a simultaneous display of each user’s modifications and annotations.
To make use of this capability, it is essential to complete these steps:
- Share the Excel workbook with the users. This can be done by selecting the option “Share Workbook” on the Review tab under the group “Changes”. Check the box “Allow Changes by More Than One User…”, and then click OK. Permit Excel to save the workbook when you see a prompt. When the feature “Track Changes” is enabled, the workbook is automatically shared.
- The shared workbook must always be shared by anyone who makes edits to it. They should create a copy of it in a specific format (.xls or .xlsx), using a distinct file name.
With all the necessary preparations complete, you are now ready to merge copies of the shared workbook.
Below are the steps to merge:
- Enabling the “Compare and Merge” Workbooks Capability in Excel
Despite the feature “Compare and Merge Workbooks” being present in Excel versions 2010 to 365, the feature is not readily visible in Excel’s interface. Follow the instructions below to add this command in Quick Access:
- When you launch Quick Access, click on “More Commands.”
- From the drop-down, “Choose commands from”, select “All Commands”. This can be found in the dialog box “Excel Options”
- Under all commands, click on “Compare and Merge Workbooks,” and tap the “Add” button. This will move the workbook to the right-hand part.
- Save the changes by clicking “OK.”

2. Merging and Comparing Workbooks in Excel
Once all users have completed their work on the Excel workbook shared, all copies can now be merged into a single file using these steps:
- Launch the shared workbook’s primary version.
- Access the Quick Access toolbar and select the command “Compare and Merge Workbooks”.
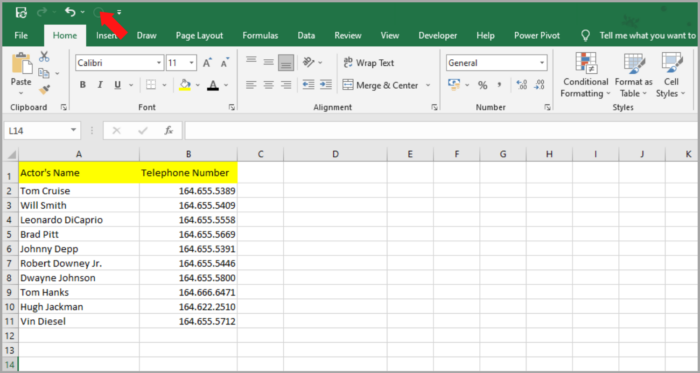
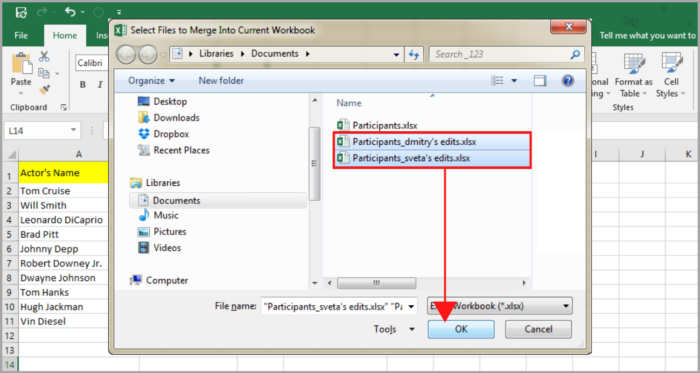
- In the resulting dialog box, choose the workbook copy that was shared and that you wish to merge. You can select multiple copies by pressing down Shift and clicking all of the file names. After making your selections, click “OK.”
3. Make a Review of the Modifications
Follow these instructions to easily review the different users’ edits made in one place:
- Navigate the “Review” tab and select the Changes group. Click on “Track Changes” and then “Highlight Changes”.
- You have to select “Highlight Changes on Screen” which can be found in the dialog box “Hightlight Changes” and below that, tick the boxes When (click on the arrow down button and select “All”) and Who (click on the arrow down button and select “Everyone”). Click on OK.
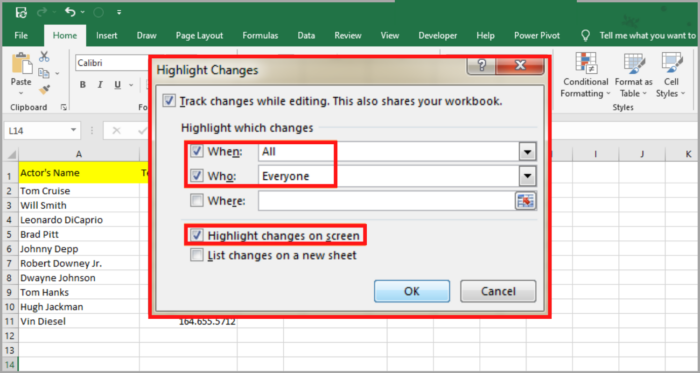
The discrepancies in the rows and columns are indicated by a dark red highlight. Various users’ changes in the cell level are denoted by different colors. If you want to identify who among the users has made a modification, simply move your mouse cursor over the relevant cell.

Note: If in your Excel workbook the command “Compare and Merge Workbooks” is disabled, it is likely that you are attempting to merge various files in Excel. Please note that the feature “Compare and Merge Workbooks” is designed to only merge workbooks of similar copies that are shared.
Comparing Excel Files (Third-Party Solutions)
Microsoft Excel, as shown, provides a few options for comparing data across different workbooks.
However, none of them is truly capable of doing an extensive comparison of Excel sheets or whole workbooks to find every instance of differences in formula, values, or formatting.
Because of this, it is likely that you will need to utilize third-party tools designed expressly for combining, comparing, and updating workbooks and Excel sheets if you need more sophisticated and effective techniques for the comparison between two files in Excel.
There are four advanced tools used to compare two Excel files: Synkronizer Excel Compare, Ablebits Compare Sheets for Excel, xlCompare, and Change Pro for Excel.
Synkronizer Excel Compare: An All-In-One Solution for Comparing, Merging, and Updating Excel Files
This add-in provides an efficient solution for comparing, merging, and updating Excel files, eliminating the need for a manual search for differences.
The features below of Synkronizer Excel Compare can assist you in quickly and dependably comparing two workbooks or Excel sheets:
- Quickly identify differences between two workbooks or Excel sheets.
- Merging into one version without generating duplicates of several files in Excel.
- Highlight the discrepancies in the sheets for easy identification.
- Filtering out irrelevant differences to focus on the changes that matter most.
- Merge and update sheets with ease.
- Producing detailed and easily readable difference reports.
Here are a few test scenarios to get a feel of how Synkronizer works:
Comparing Excel Files: Identifying Differences between Two Spreadsheets
Imagine you are managing an event and have collected data in an Excel table that includes actor names, telephone numbers, and other details.
Additionally, you have a few managers who directly interact with the actors and database, which makes the Excel file have two versions.
Just press the Synchronizer 11 icon under the Add-ins menu to start Synkronizer Excel Comparison.
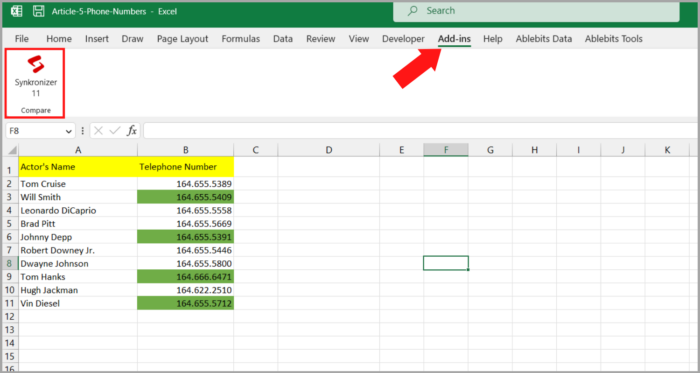
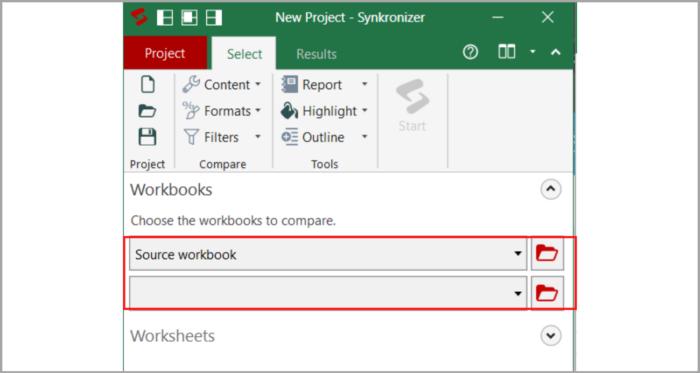
Upon launching Synkronizer Excel Compare, a pane will appear on the left side of your window in Excel. Here, you can perform the following actions:
- Now, select the two(2) workbooks you want to compare.

- Click on the sheets up for comparison. Synkronizer will automatically match and choose any of the sheets containing similar names in the specified workbooks for comparison.
You may also manually pick the worksheets or set different criteria for matching the sheets, such as the type of worksheet which can either be protected, hidden, or all). 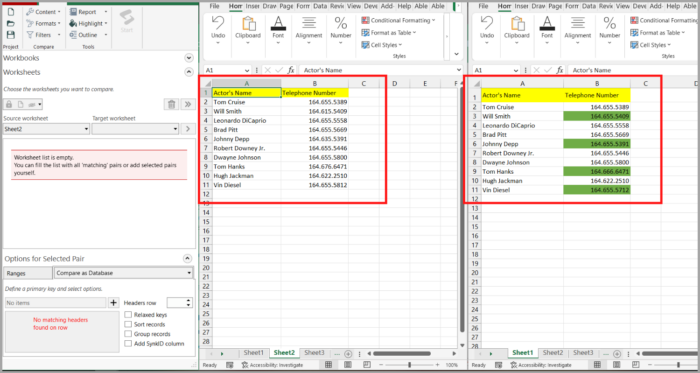
The add-in for Synkronizer will organize and show the worksheets side-by-side, in vertical or horizontal format, after you have chosen them, much like the View Side by Side option in Excel.
- Choose either of the below options for comparison:
- By default, compare the worksheets normally, which is suitable for most cases.
- Should the selected sheets not contain new or deleted columns or rows, you can use the “1 on 1” comparison with link options to compare them.
- For sheets that contain a structure of a database, it is recommended to use the “Compare as database” option.
- Use the “Compare selected ranges” option to specify the ranges to be compared if you just want to compare certain ranges rather than the complete sheets.
4. You have the option to select which types of content you would like to compare.
You can select the content type or types that are essential to your present work from the Compare Group under the “Select” menu.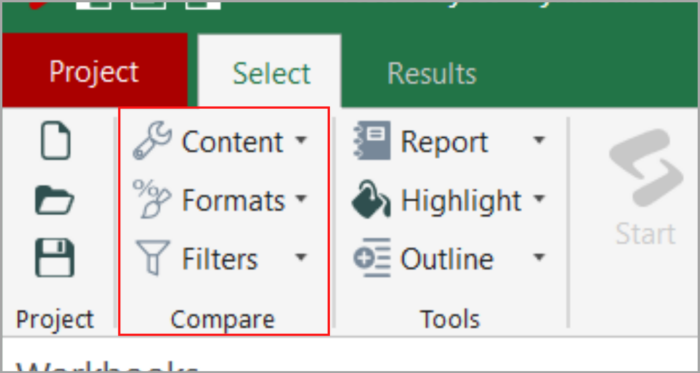
- Within the “Content” option, you have the ability to choose the names and comments to be compared.
- In the “Formats” section, you can choose the specific cell formats you would like to compare.
- You can filter out any discrepancies you might not want to see using the “Filters” option. You may decide to disregard a variety of things, such as trailing or leading spaces, cases, all formulas, certain formulas that produce the same results, hidden columns and rows, and more.
5. To start the comparison process, click on the red “Start” button that is positioned on the ribbon.
Creating Visual Representations and Examining Distinctions
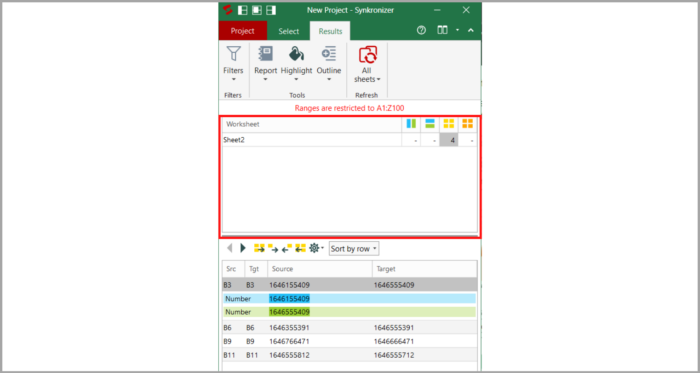
Typically, Synkronizer completes a comparison between two sheets in a couple of seconds, and on the Results page, it delivers two summary reports.
- The summary report provides a comprehensive view of all types of differences, including changes in rows, columns, cells, formats, comments, and names.
- Users can receive a comprehensive report of the differences by clicking on the summary report of a particular difference type.
As seen in the below screenshot, the sample sheets used in this example have generated two reports: a summary report (found in the upper portion of the Results pane) and a report on cell differences (found in the lower portion of the pane).
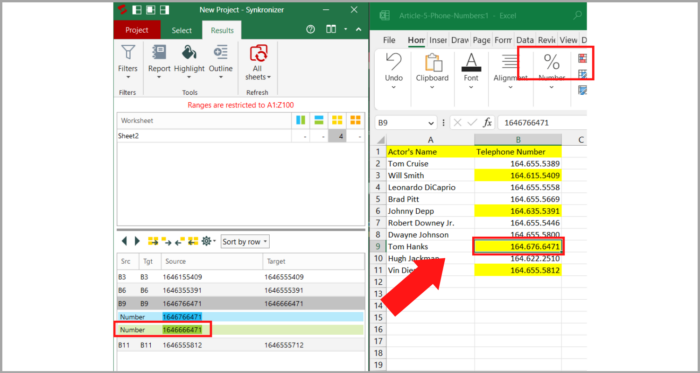
Selecting a discrepancy in the detailed report will highlight the respective cells on the two sheets. In the screenshot below, only one sheet is displayed because there is enough space to show them both.
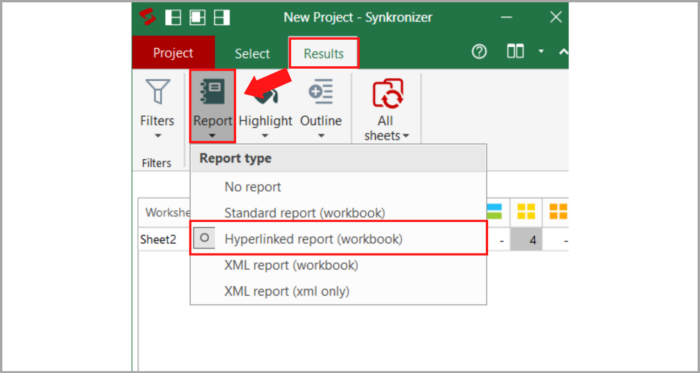
For a different report, you may choose to produce a separate worksheet in either a conventional or hyperlinked style. You may instantly navigate to a certain discrepancy with a single mouse click.
Comparing the Rest of the Sheets in Two Different Workbooks at the Same Time
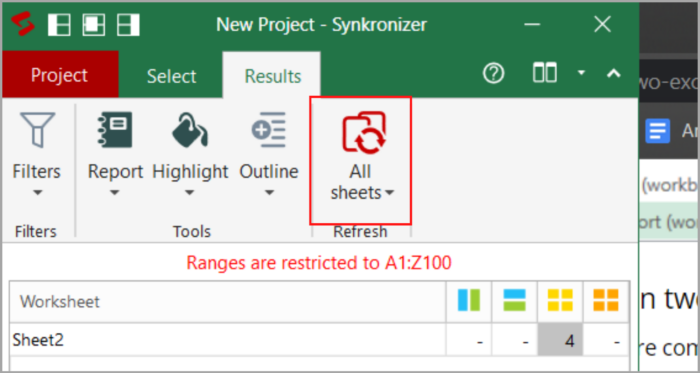
The summary report will show you all matching pairs of worksheets when comparing two Excel files with multiple sheets:
Pointing out Disparities Among Spreadsheets
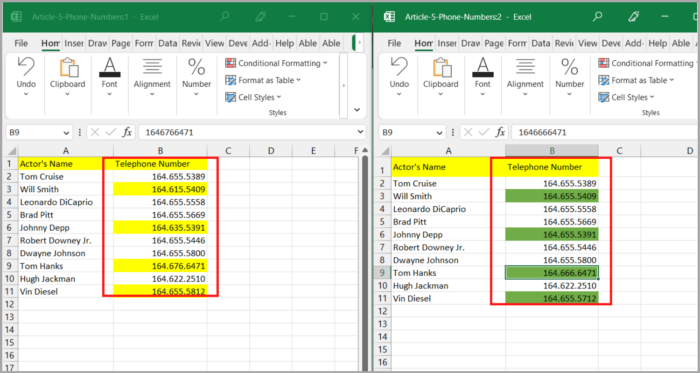
As seen in the following picture, the Synkronizer Excel Compare add-in will, by default, immediately highlight any discrepancies found:
- Yellow – indicates differences in cell values
- Lilac – shows the differences in the formats of cells
- Green – shows inserted rows.
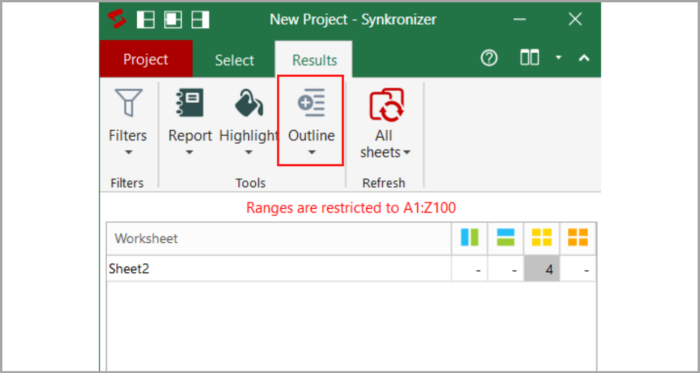
By selecting the desired parameters after clicking the “Outline” button on the “Results” page, you may emphasize just the important differences.
Combining and Updating Spreadsheets
The merging functionality of the Synkronizer Excel Compare add-in is unquestionably one of its most useful features.
You may quickly update your primary sheet by copying individual cells, full rows, or complete columns from the original sheet to the target sheet.
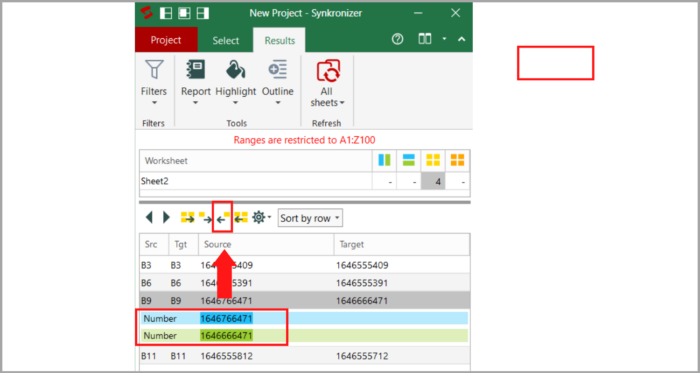
You can choose one or more differences in Synkronizer’s pane and then select one of the four update icons to update the differences.
Whereas the second and third buttons simply update the specified differences, the initial and final buttons update all disparities (the arrows on the button determine the transfer direction).
Excel Tool for Comparing Spreadsheets by Ablebits
The most notable of the more than 40 new functions and enhancements included in the most recent edition of the Ablebits Ultimate Suite is the Compare Sheets tool, a unique tool to compare worksheets in Excel.
The add-in has been created with the following benefits to enhance the experience of the user and make comparisons more understandable:
- A wizard that walks you through the comparing process step-by-step and lets you choose different settings.
- Choose the most appropriate comparison method for your sets of data
- The sheets compared are shown in Review Differences format rather than a difference report, allowing you to evaluate all variations at once and handle them separately.
Let’s compare the sample spreadsheets from our earlier example using the Compare Sheets feature to see whether the outcomes are different.
- Under the “Merge” group, click on the button “Compare Sheets” which can be found on the Ablebits Data tab.

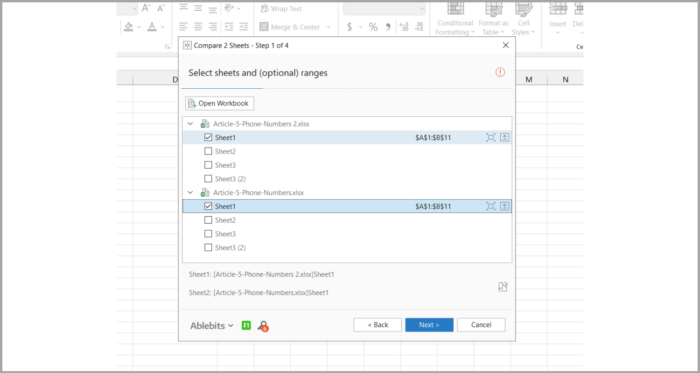
- The wizard will pop up and ask you to choose the worksheets you want to examine and find discrepancies from. All of the sheets are selected by default, but by selecting the relevant button, you may alternatively pick just the present table (“Select the current table”) or just a certain range (“Select a range”).

- You will be asked to choose the algorithm for comparison in the next step:
- No key columns – This is a default technique that is most suited for documents that are sheet-based like contracts or invoices that lack distinctive identifiers that may be used as key columns.
- By key columns – This approach is best suited for column-organized sheets with one or more distinctive identifiers, such as product IDs or order numbers.
- Cell-by-cell – This technique compares each cell to its equivalent on the other sheet, and is effectively used to make comparisons among spreadsheets with the same style and size, such as balance sheets or maybe year-to-year reports.
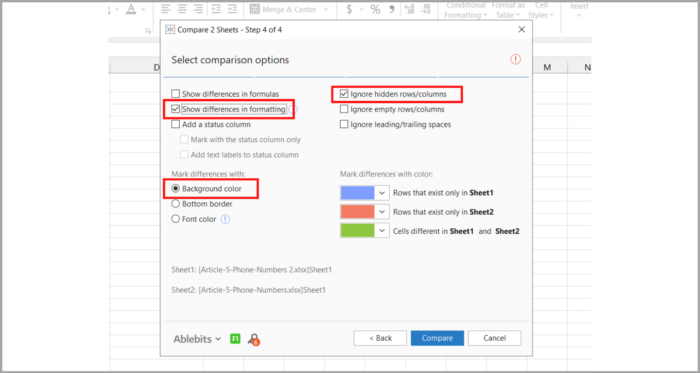
- In the end, determine which disparities to accentuate and which ones to dismiss, and establish the method of distinguishing the differences. As cell formatting holds significance for us, we choose to exhibit variations in formatting. Disguised columns and rows bear no importance, and we direct the add-in to exclude them.

- To give the add-in time to examine your data and create backup copies, click the Compare button. There is no need to be concerned about the protection of your data because backup files are made automatically.
Inspect and Integrate Dissimilarities
After the spreadsheets are analyzed, they have launched side-by-side employing a unique mode for reviewing differences, with the initial difference highlighted.
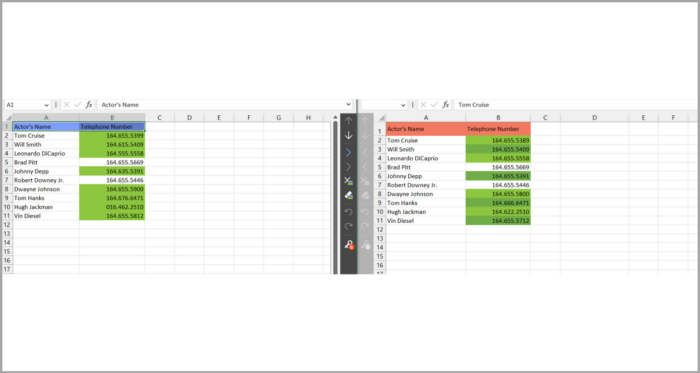
In the screenshot provided, the discrepancies are distinguished by the default color scheme as follows:
- Blue rows denote rows that only appear on Sheet 1 (shown on the left).
- Red rows are rows that only appear on Sheet 2 (shown on the right).
- Green cells are those that vary in partially matched rows.
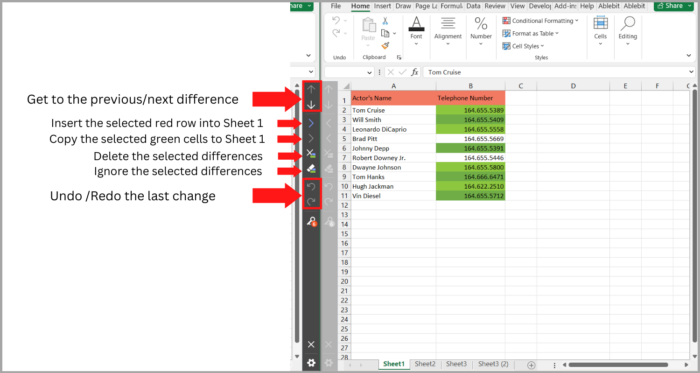
Each spreadsheet includes a unique vertical toolbar to make it easier to examine and handle discrepancies. The inactive worksheet found on the left side of the screen has an inactive toolbar, but any cell in the connected sheet can be selected to activate it.
With the help of this toolbar, you can go over each of the noted discrepancies one at a time and choose whether to take them into account or ignore them:
You will be prompted to save the workbooks and quit the Review Differences mode when the final discrepancy is resolved.
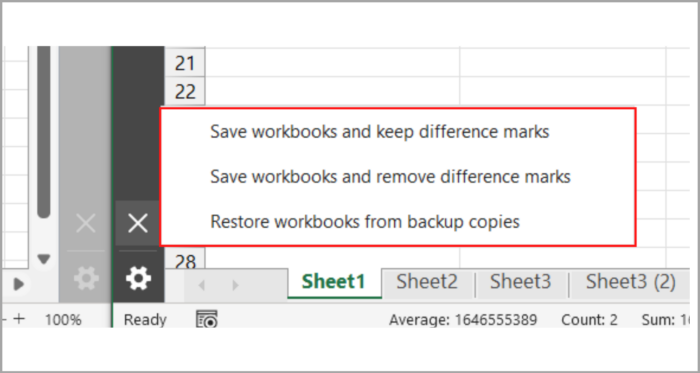
Press the Exit Review Differences button at the bottom of the toolbar to stop discrepancy handling in progress if you have not completed the discrepancy check yet. You can pause and instead choose one of the following options:
- Preserve the adjustments that you have done and erase the residual markers of differences.
- From the backup files, reinstate the primary workbooks.

xlCompare: Analyze and Integrate Sheets, Workbooks, and VBA Projects
With the assistance of the xlCompare tool, you can contrast two files in Excel, sheets, titles, and VBA projects.
It enables for the speedy integration of discrepancies and recognizes added, deleted, and updated information. It also provides the following features:
- Identify and delete any records that are duplicates among two spreadsheets.
- Replace all of the data in one sheet’s available data with data from some other sheet.
- Add distinct (new) columns and rows to another sheet.
- Any updated data should be combined from one spreadsheet to another.
- By the main column, sort the data on the sheets.
- You may refine the comparison results to see records that differ or that are the same.
- Color-coded highlights of comparative outcomes.
Comparing Excel Sheets on Desktop and Mobile Devices using Change Pro for Excel
This provides you with the choice of doing a comparison that is server-based when comparing two sheets in desktop Excel and on mobile devices.
The following are some of this tool’s primary features:
- It can detect variations in formulas and values across two sheets.
- It can detect layout modifications, such as newly added or removed rows and columns.
- It can identify embedded items like graphs, charts, and pictures.
- It has the ability to produce and publish reports with different formulas, values, and layouts.
- It offers possibilities for the difference report on significant changes to be filtered, sorted and searched.
- You may easily compare files from Outlook or document management programs.
- All languages, including multi-byte, are supported.
Comparing Excel Files using Online Services
In addition to traditional desktop utilities and tools, several web-based services are available to facilitate the rapid comparison of two sheets in Excel without requiring any software installation on your device.
While security may be a concern if your files in Excel lack sensitive information, employing a free service online can yield immediate outcomes.
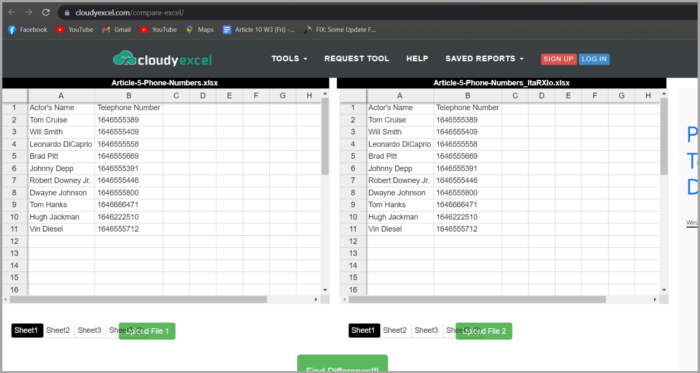
There are various options available, such as CloudyExcel or XLComparator, along with similar tools accessible online. For instance, CloudyExcel appears as follows:
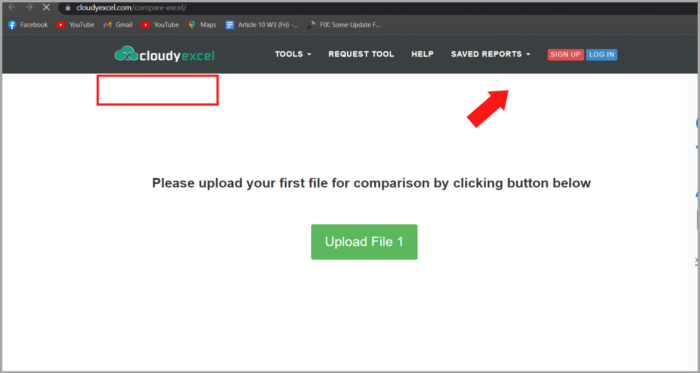
To compare two workbooks in Excel, just upload them and click the button “Find Difference” at the bottom of the screen.
The unique differences between the two active sheets will be highlighted using different colors in a matter of seconds:
Conclusion
The above steps can aid you in comparing files in Excel to spot differences.
However, if the described solutions are not ideal for your needs, you may look out for more sites that cover different facets of comparing Excel files.

